Creating Print and Call Center Campaigns
To prepare a print campaign, go to "Manage print campaigns" (Catalog > Other campaigns > Manage print campaigns).
To prepare a call center campaign, go to "Manage call
center campaigns"
(Catalog > Other campaigns > Manage call center
campaigns).

Creation of a print campaign and a call center campaign
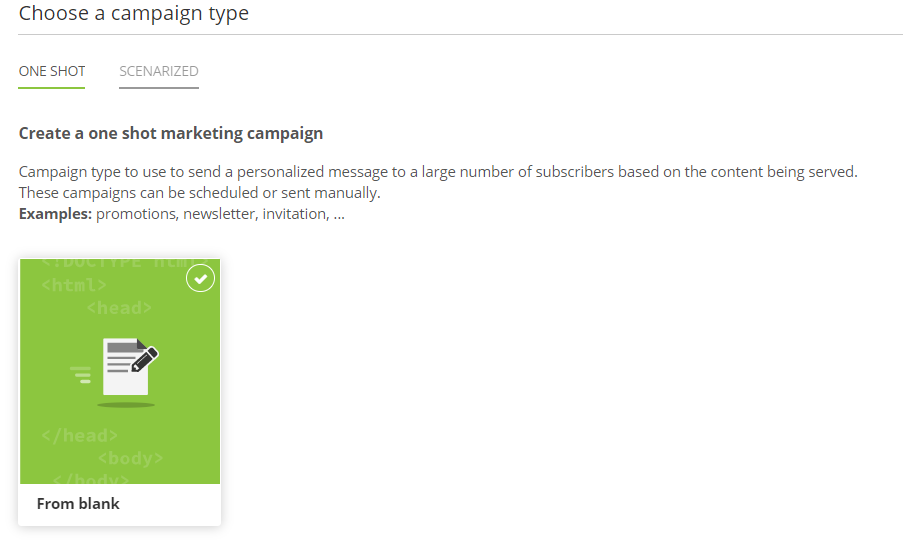
To begin with the creation of your campaign, click on the '+ Create a campaign'.
Choose the campaign type
First, you will have to choose the campaign type :
-
One-shot: This type of campaign is sent at given time to a great number of profiles all at once.
-
Scenarized: This type of campaign is activated for continuous sending. It can be triggered automatically via Scenarios.
Good to know
After choosing the campaign type, switching from one type to the other is no longer possible.
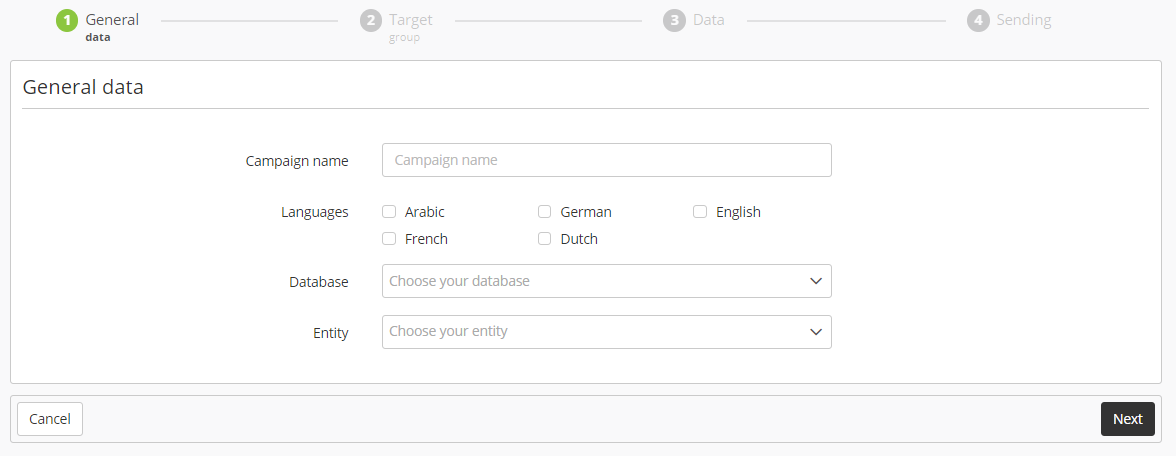
Step 1: General data
First of all, define the base data of your campaign.
-
You will have to choose the name of your campaign. This is the internal name of the campaign.
-
Next, choose the language of your campaign. As for other channels, you can choose between several languages if needed (among the languages available in your license).
-
Select the database to which you would like to send the campaign.
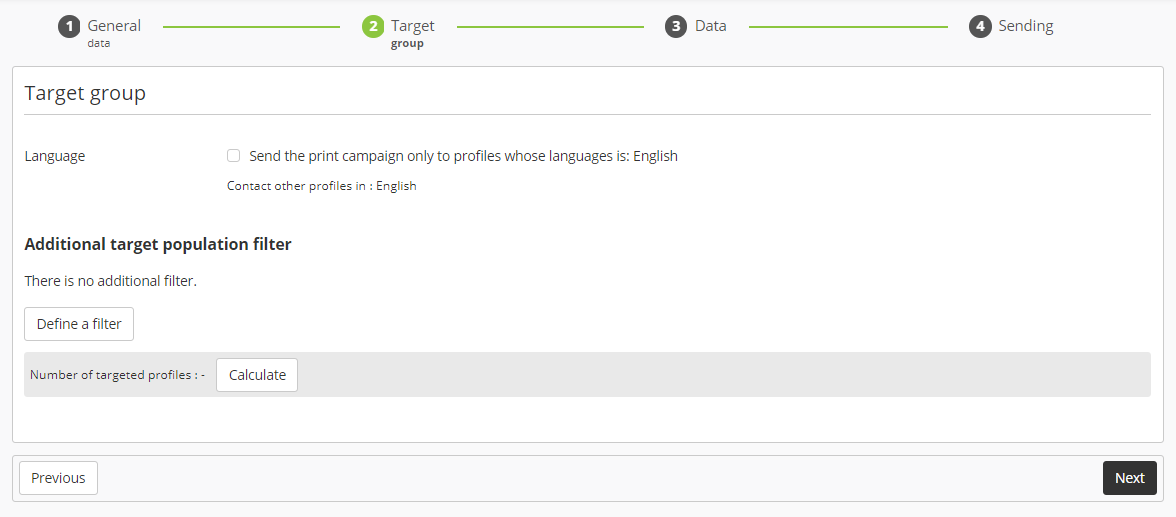
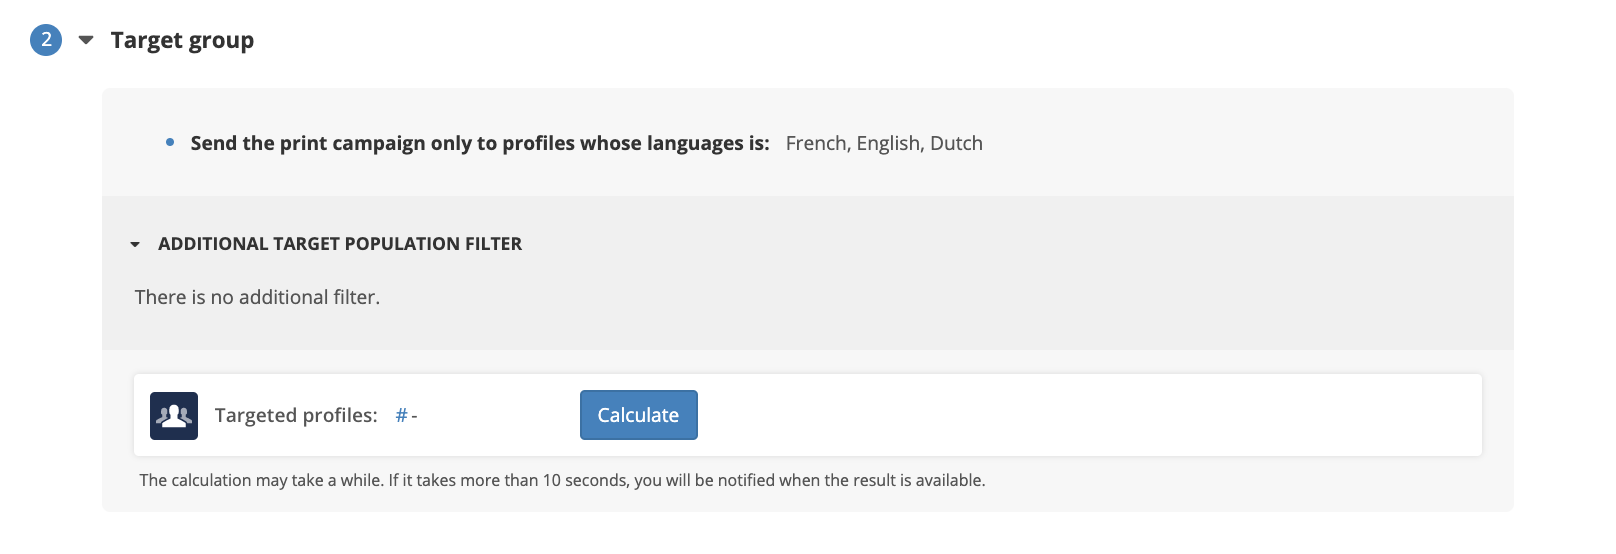
Step 2: Target group
Next, select the profiles that you want to target with your campaign.
-
You can choose to only send the campaign to the people whose language you selected at step 1 or choose a default language to contact everyone.
-
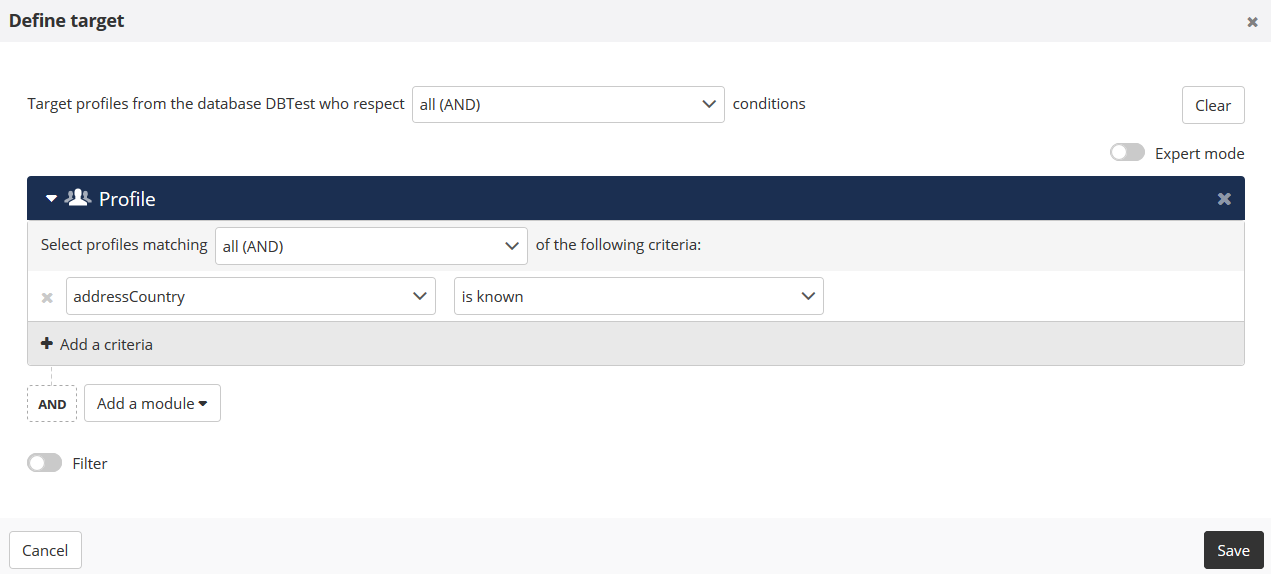
You can also filter the target population. By clicking on the 'Define a filter' button, a pop up window will open and let you filter your profiles more precisely thanks to the Targeting module.
-
After choosing the filters applied to your target population, you can also calculate the number of targeted profiles.
This step involves using the 'Targeting' module. For further information about how it works, we invite you to read the chapter dedicated to 'Targeting'.
Step 3: Data
This step consists in choosing the data that you want to include in the file intended for the printing/ or the call center company.
There are two options :
Add profile attributes
Click on 'Add columns' to add simple profile attributes from your database (including technical attributes, subscriptions and segmentations).
The dropdown menu will remain open after the addition of an attribute, so you can add several columns one after the other. A pop-up will inform you that an attribute has been successfully added to the file.
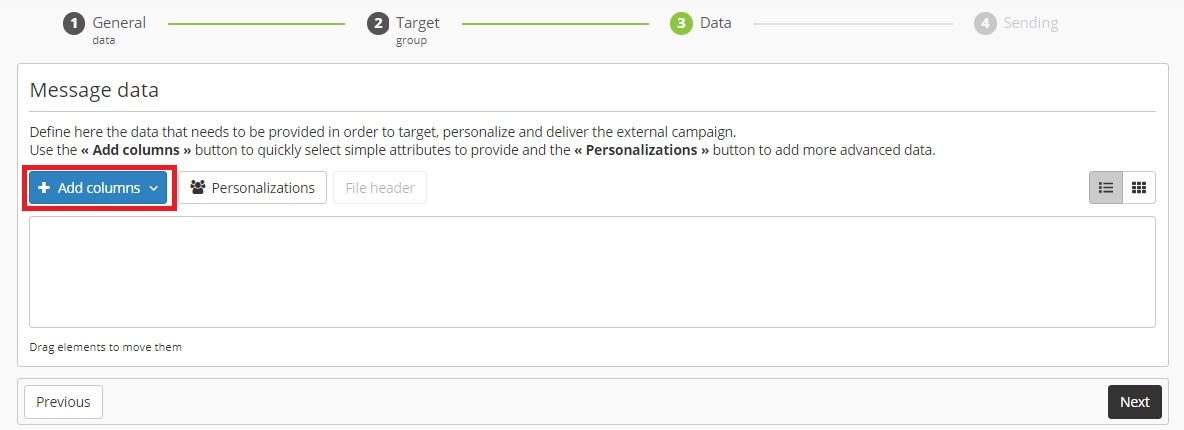
Add advanced values
Click on the 'Personalizations' button for advanced features.

In the 'Personalizations' editor, you will be able to edit any value added via the 'Add columns' button.
Activate the 'Expert mode' to add advanced data sources.
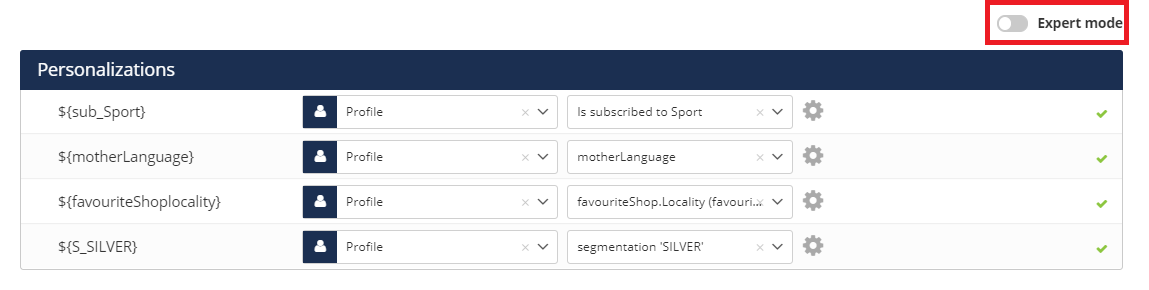
A new tab called 'Data sources' will appear in the interface. Three kinds of advanced data can be added.

-
Survey: to personalize using information from an Actito survey
-
Table: to use information from the Custom tables of the Data Model
-
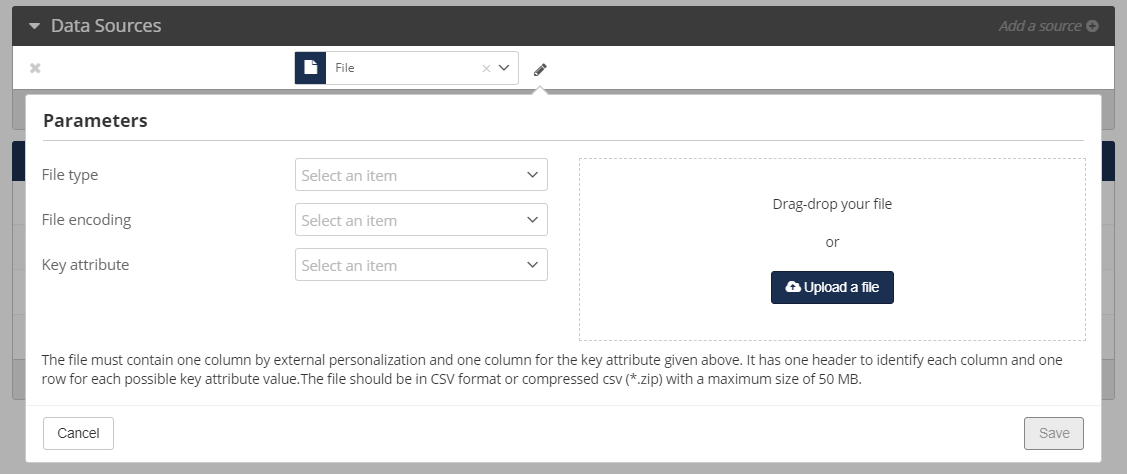
File: to personalize with an external file (csv file). This is useful to personalize with one-off data which do not need to be stored in Actito.
As you are not designing your Print and Call Center campaign directly in the interface, the 'File' source can be really useful to add external data to your campaign (for example, a personalized discount code on your flyers).
You will be invited to select a CSV file. Its first column must be the key attribute used to link the external value to each profile. The following column(s) will contain the external value(s). The first line must be header.
Next, specify the type and encoding of the file, as well as the name of the attribute acting as the key. The key of the file does not have to be a unique attribute : the personalization value can be the same for several profiles (eg. : personalization based on the postal code, the gender,...)
Tip
The name of your external personalization file, as well as the name of the headers, cannot include special characters or spaces.
However, special characters and spaces are allowed in the value of your external personalization.
Format data
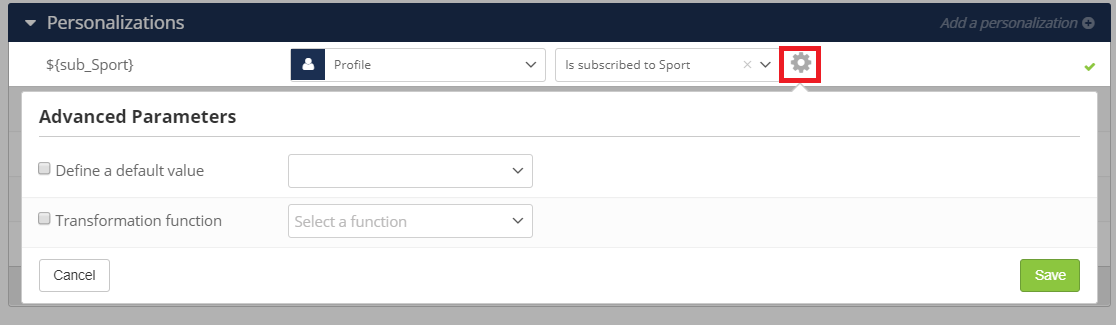
You can click on the 'cog' icon to configure advanced parameters, which are :
-
Define a default value : You can define a default value, which will replace the personalization if it does not have a value for the profile.
-
Transformation function : You can choose the format of dates or provide a mapping to format specific attribute (eg. : replace the 'M' or 'F' value of the 'sex' attribute by Mister or Madam)
Format the file
After choosing the elements that you want to include, it is possible to drag and drop them with your mouse to modify the organization of your file.
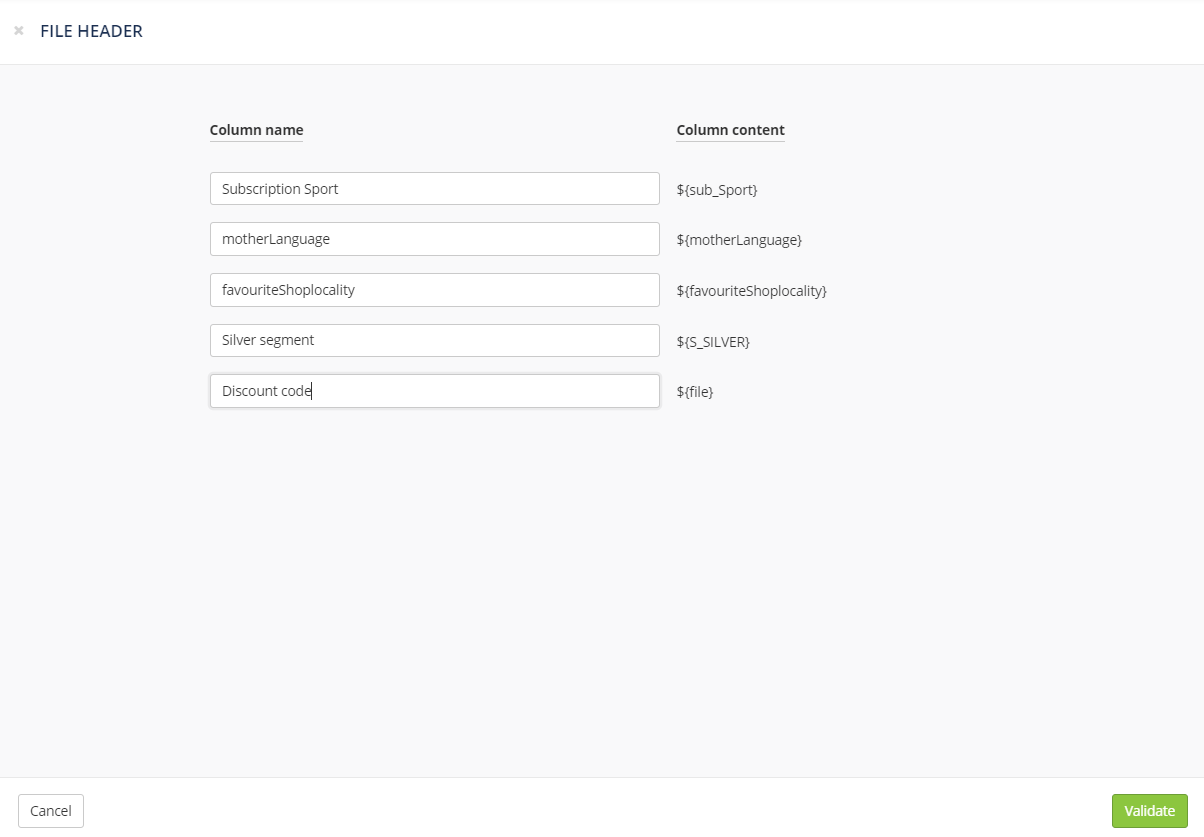
It is also possible to modify the name of the headers in the resulting file by clicking on the 'File header' button.
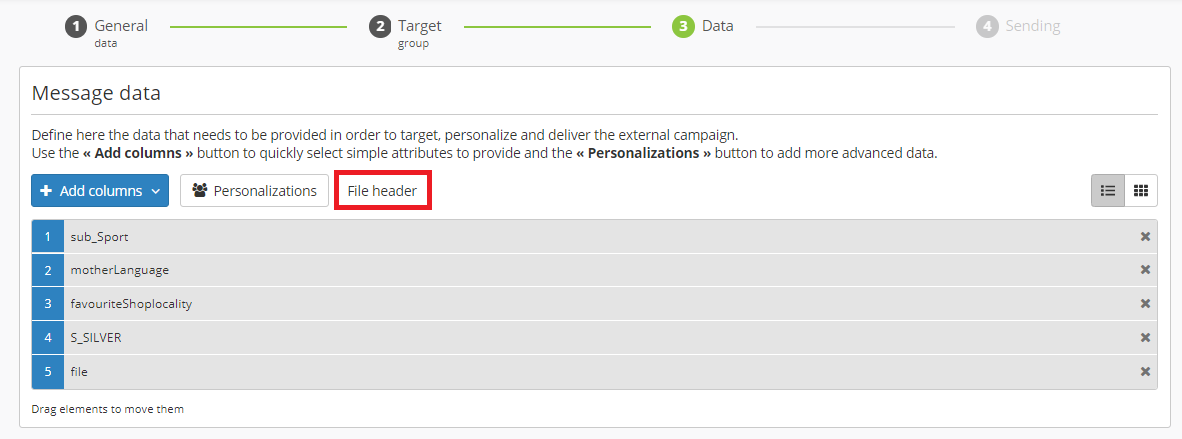
By default the column names are the technical names of the attributes (with 'sub_Subscription' for subscriptions and 'S_Segmentation' for segmentations).
If you need to follow different naming conventions, rename the columns as you wish them to appear in your final file and click on 'Validate'.
Step 4: Sending
The summary of your campaign will be displayed.
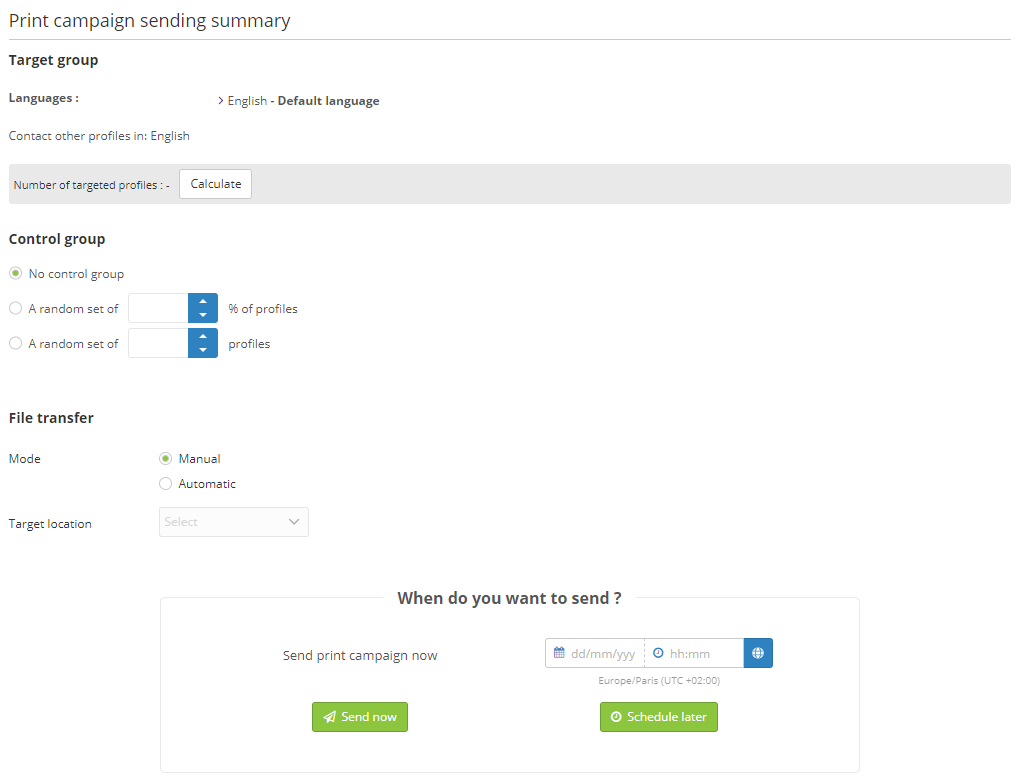
Target group
You can check the language setting, check the target population and recalculate the number of targeted profiles.
Control group
First, you need to turn on the advanced parameters. You can specify a control group by selecting either a percentage or an absolute number of profiles.
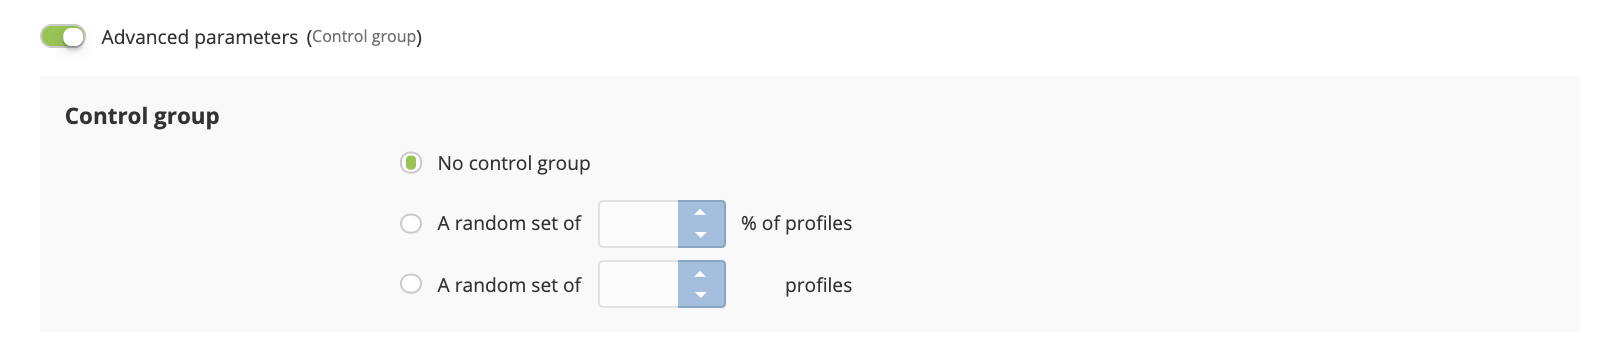
A control group is a population sample to which the campaign will not be sent, in order to compare its efficiency with the behaviour of those profiles who did not receive it. The control group doesn't receive the campaign even when they are part of the target. There isn't any report specific to them, additional column or file because they are not contacted at all.
In a standard export, the profiles belonging to the control group will be counted as "non-sent", and it will be mentioned that they belong to a control group. It is possible to find the list of profiles filtered in the control group by using the targeting module.

File transfer
There are two ways to transfer your file :
-
Manuel : you will manually download the file to transfer it to the printing /or call center company yourself (see step 5).
-
Automatic : the file will be automatically dropped on a FTP server. You will be able to choose a target location among the locations available in your licence via a dropdown menu. If the campaign is scenarized, the FTP drop will occur daily at the time of your choice.
Tip
To request the creation of a FTP configuration, please contact your Actito account manager.
If a FTP is already set-up on your licence (eg. : for ETL synchronizations or standard exports), it will already appear in the target locations. But you may require an additional configuration if the campaign must be dropped on another directory than your synchro/export files. In such case, please contact your Actito account manager.
Sending/activation your campaign
Once your campaign is ready, you can :
-
'Activate' it if it is a scenarized campaign. It will be available in the Scenario application.
-
'Send now' to send it immediately or 'schedule later' to select a sending date and time in the future (with the help of the timezone converter if needed)
Case of a scenarized sending
The campaign will stay in the 'In progress' tab.
Case of a one-shot sending
If you choose to 'schedule it later', your campaign will remain in the Scheduled tab.
If you 'sent it now', after a short time, depending on the size of your file, the campaign will be available in the 'Sent' tab, to the left of your screen.
Step 5 : Retrieve you file manually
If your file transfer mode is 'manual', find your campaign in the appropriate tab according to the sending type. Use the search bar if necessary, then select the campaign. The line will turn green.
Click on the 'More' button, followed by 'Download lines'.
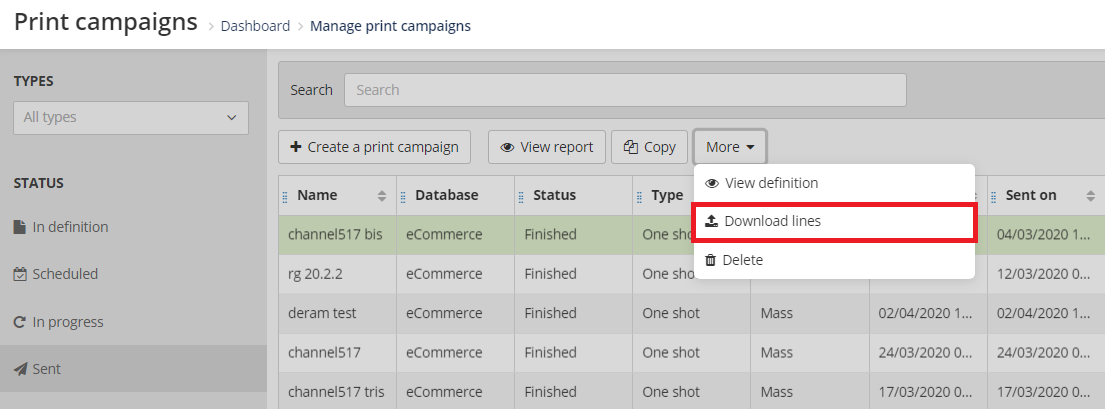
Tip
The 'Download lines' button will not be available if your file is automatically dropped on a FTP server.
You will be able to download the file intended for the printing/or call center company.
You can specify the 'Deposit date', which is the date at which the lines have been acknowledged (by default, it is the date of day).
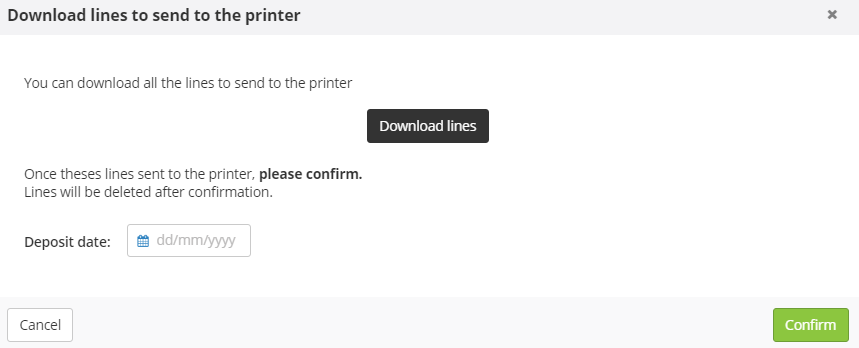
After downloading the file, click on 'Confirm' to delete the lines.
Deleted lines can no longer be downloaded.