Managing Newsletters
Thanks to the Newsletters app, you can automatize the sending of mass e-mails at a given frequency.
You can use external content for your newsletter, and you won't have to set up the sending on the Actito interface every time that you want to send out a newsletter
Unlike the different types of e-mail campaigns, newsletters are managed via an application specifically dedicated to this feature. This is the "Manage newsletters" application, available via: Catalogue > E-mail campaigns > Manage newsletters.

Note
The Newsletters application is an add-on, a complement to the usual offer by Actito. If you are interested in this feature, please, contact your CSM.
Creating a newsletter
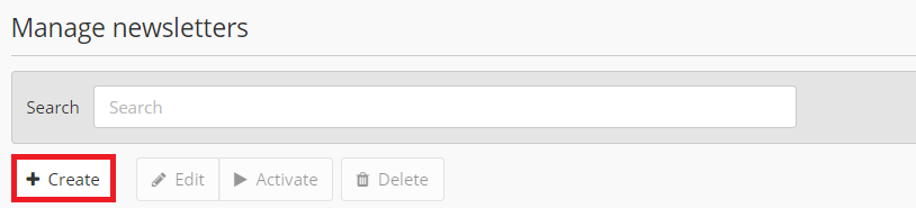
To create a new newsletter, click on the button "+ Create".
Newsletters require using a sending template. It is indeed not possible to create your e-mail from A to Z via this method. The database and the target population cannot be directly specified, they must be defined and saved beforehand.
To save a sending template, we invite you to read the existing online documentation on the topic.
Recuerda
When saving the campaign template, you will have to define a name after the following scheme: a common prefix and an automatic suffix representing the date format. The newsletter name will be generated after this template name. Thus, the same template cannot be used for two different newsletters, otherwise there will be a naming conflict.
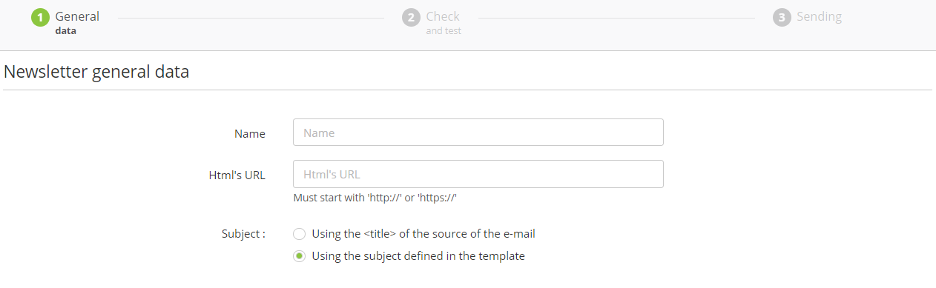
1st step: General data
The first step to create newsletter is about defining its general data.
There are two types of newsletters. Depending on which type you chose, the parameters at this stage of the process should be defined differently.
Dynamic newsletters
Dynamic newsletters retrieve the HTML content of your email from an external site. Every time a Newsletter is triggered, the latest content will be imported from that site. This is the perfect option for media and newsletters on news and novelties.
In this way, the email can be designed without having to use the Actito interface nor the Actito webservices. This allows you to, for example, outsource the design of your newsletters to an external partner without fearing integration issues.
Naming the campaign. This is the name that will appear in the Newsletter app.
Providing the URL of the HTML. The content of your e-mail must be posted on a webpage specifically dedicated to this purpose. State here your URL to the site, which should have been updated with the new content before the Newsletter is generated.
Subject: There are two possibilities to define your email subject as your recipients will receive it their inbox.
Provide a <title> tag in the html. The subject will be directly defined whenever the source of the e-mail is modified.
Using the subject defined in the template. In this case, please make sure that there is a subject defined in the template. If not, the newsletter will fall into error.
Note
You can use personalizations and conditions in your dynamic newsletters.
You just need to insert the personalizations and the conditions in your campaign template, configure them as usual through the variable editor and make sure that you save the variables correctly when saving the template.
In the external HTML you will have to use the variable names that you set up in the template, always following the Actito rules (${perso}, data-actito-if=${condition}). The template content will be replaced by the external HTML, but the personalizations and conditions will remain as configured.
Static newsletters
The Newsletter application can also be used to set up mass periodic emails with the exact same content. The email body will not be then retrieved from an external site. Instead, the same campaign template content will be sent every time. This content will also be partly dynamic thanks to the personalizations and conditions that can be defined in the template.
This is the perfect solution when we want to send the same message to a big target and at a given frequency. For example, we can use it to send a monthly reminder to our customers that their account statement is available.
Naming the campaign: This is the name that will appear in Newsletter app.
Providing the URL of the HTML. For static templates, this field should be left empty because the content is provided by the template.
Subject: In the case of a static newsletter, you have to choose the option "Using the subject defined in the template". You should then check that the subject has been correctly defined in the template. Otherwise, the newsletter will fall into error.
2nd step: Control and test
After defining the newsletter general data, it is time now for the testing parameters.
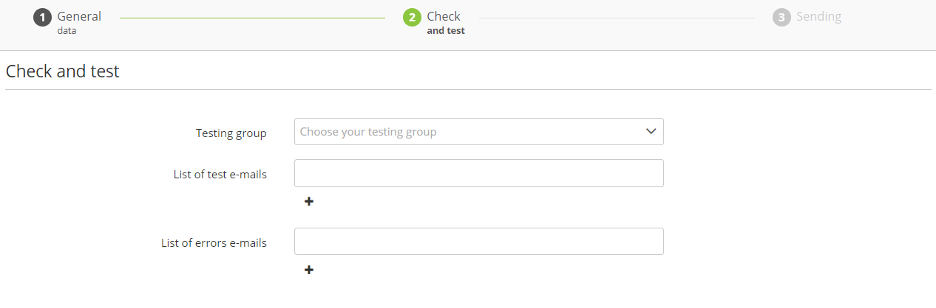
To do so, select the group of profiles on which the customization of your test emails will be based. Your existing testing groups will be available in the dropdown menu. The testing group will only be used to adapt the content of the test email and not as real recipients.
In the "List of test e-mails" field, specify the list of e-mail addresses to which you want to send the tests. They will receive a test email for every profile in the testing group.
In the "List of errors e-mails" field, specify the list of e-mail addresses to which you want to send the error reports if a test e-mail cannot be sent.
After that, click on "Next". The tests or the error messages will be automatically sent to the given addresses every time a newsletter is generated.
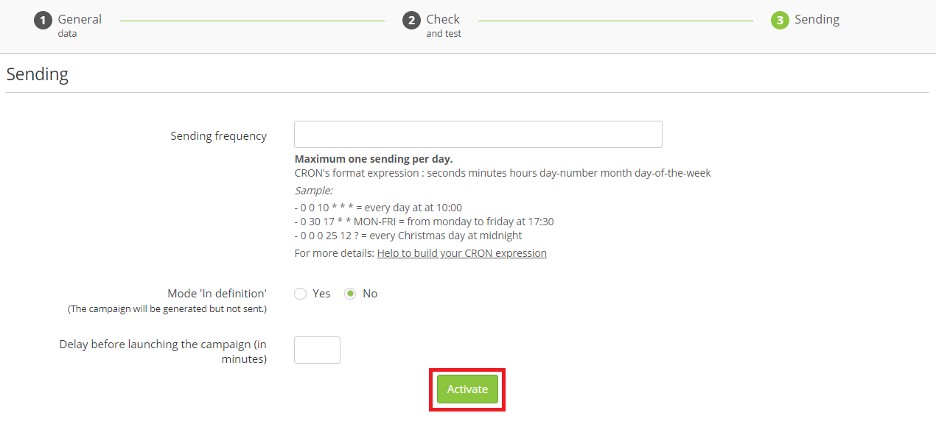
3rd step: Sending
After defining the parameters of your newsletter, the last step is about planning its sending.
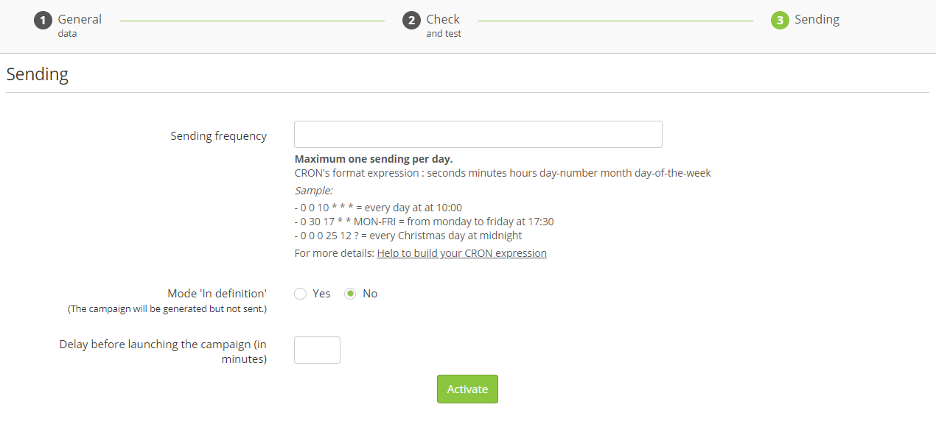
As it is a continuous sending and not a one-off sending, you will need to define a sending frequency. This is done through a CRON expression.
A CRON expression is made of 6 fields separated by a blank space. Every field represents a time unit according to the following order:
seconds
minutes
hours
date of the month
month (number of the month or its three first letters in English)
day of the week (number of the day or its three first letters in English)
Examples:
0 0 10 * * * = every day at 10:00
0 30 17 * * MON-FRI = Monday to Friday at 17:30
0 0 0 25 12 ? = every Christmas Day at midnight
An asterisk means that every unit of a time subdivision is taken into account. The degree of precision of the frequency will be given by the fields in which there is a value.
Two values separated by a comma mean that both units are taken into account. For example: 5,8 = units 5 and 8.
Two values separated by a hyphen mean that every unit included between these units are taken into account. For example: 5-8 = units from 5 to 8 (5, 6, 7, 8).
Note
Newsletters can only be sent once a day.
The "Mode 'In definition'" box allows you to plan that the newsletter will not be sent until the test newsletter is validated.
In this case, you will have to check the definition and the content of your newsletter, and then validate the sending if everything is correct. You can also modify it or delete it, in case it's necessary.
If you choose not to use the "In definition" mode, you will be able to specify a delay (in minutes) between the generation of the test and the sending of the newsletter.
The aim is to allow you to check the definition and the content of your newsletter. The difference with the "In definition" mode is that you will have to suspend the campaign if the result of the test sending is not positive. Without your reaction, the campaign will be automatically sent after the delay.
Activating the newsletter
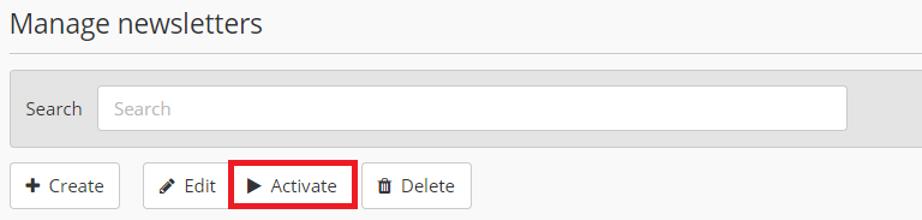
After completing every step of the process, it only remains for you to activate the newsletter.
Click on the "Activate" button to immediately activate your campaign.
The newsletter will appear in the "Active" tab on the left side of your screen.
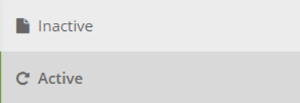
The only way to activate a newsletter is by clicking on the "Activate" button. Clicking on "Validate" will only save the newsletter, which will be available in the "Inactive" tab, where you will still be able to edit it.
You will be able to activate it via the newsletter management application. To do so, select the newsletter and then click on the "Activate" button at the top of your screen.
Managing an active newsletter
Once the newsletter has been activated, there are two possible actions:
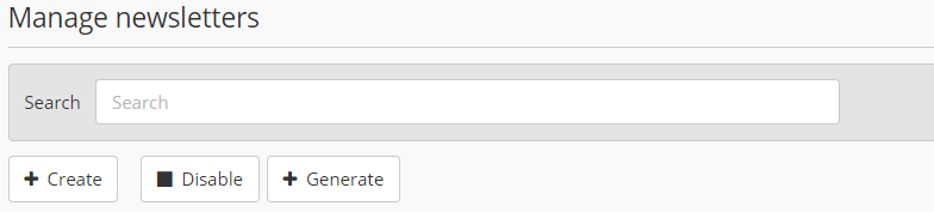
Disable: Allows you to disable the newsletter and to prevent it from being automatically sent again. This action will move the newsletter to the "Inactive" tab, where it will be possible to delete or edit it. You can also reactivate it if, for example, you just needed to modify it to correct some of the aspects of the newsletter.
Generate: By clicking on "Generate", you will immediately create a one-off newsletter sending. It will be generated as a test newsletter that you will have to validate for it to be finally sent.
Modifying a newsletter
To modify a newsletter (its sending frequency, the URL to the content site, the recipient list...), it should be deactivated beforehand. The newsletter will then appear in the "Inactive" tab, from where you can access the same process as when creating the newsletter.
To modify the elements determined by the campaign template (targeting, personalizations, the content of a static newsletter...) you will have to modify the template. You can check what template a newsletter uses from the "Active" tab.
Note
Modifying a campaign template will automatically affect all the newsletters using the template.
Validating a test newsletter
Whenever a newsletter is generated (according to the frequency defined by your CRON expression or when you manually generate a one-off sending as explained above) you will receive the test newsletter on the e-mail addresses provided at the "Check and test" stage (or the error message, if need be).
These e-mails will allow you to check and validate the content of your newsletter.
This also means that your newsletter has been created. It is now available in the "Manage e-mail campaigns" application, together with every other e-mails, whatever their type (Catalogue > E-mail campaigns > Manage e-mail campaigns).
The tab in which the campaign is found varies according to the mode chosen at the "Sending" stage (step 3):
If you chose the "In definition" mode: the campaign will be found in the "In definition" tab. In this mode, your intervention will be needed for the campaign to be sent. You will have to choose the campaign and click on "Edit". You will directly reach the last step, where you will be able to validate the sending.
If you set up a delay: the campaign will be found in the "Scheduled" tab. With this mode, the campaign will be automatically sent after the waiting period unless you take action. You can click on "More" and then on "Cancel" to stop the campaign.
Error messages
Should your newsletter encounter a problem when it is generated, you will receive an error message instead of the test newsletter.
There are two types of messages:
CONTENT ERROR: This message means that the error is related to the HTML content of the source web page (only for dynamic newsletters). It should be checked with the creator of the page.
INTERNAL ERROR: This message means that the system cannot generate the newsletter
because it cannot retrieve the content (please verify the URL provided) or
because there is an error with the sending template. Please check that every mandatory element is found in the template (especially if the subject is determined by the template).