Webservices related to E-mails
The notion of e-mail campaign defines an e-mail communication, either customized or not, which will be sent to a selection of profiles.
There are two kinds of campaigns:
Mass campaigns: the campaign will be sent to the whole target population all at once
Continuous campaigns: the campaign will be activated in order to be individually sent over time (typically via scenario, but also entirely through API)
The available API calls related to e-mails enable you to:
Create an e-mail campaign (entirely)
Set up its content, its subject, its targeting and its customizations
Send or activate a campaign
Obtain the details of an existing campaign
Obtain the interactions of a profile with a campaign
Creating an e-mail campaign
It is possible to create a mass e-mail campaign in its entirety through the ACTITO webservices. To do so, it will be necessary to make several calls in successions in order to define the various creation steps of your campaigns. You will indeed need to follow a process similar to that of the creation of your campaign via the ACTITO interface.
It will be possible at any time to take over your campaign in the ACTITO interface.
Setting up an e-mail campaign
The first step of the creation of your campaign will consist in creating it by defining its general parameters.
To do so, you will need to use the operation POST/entity/{e}/mail
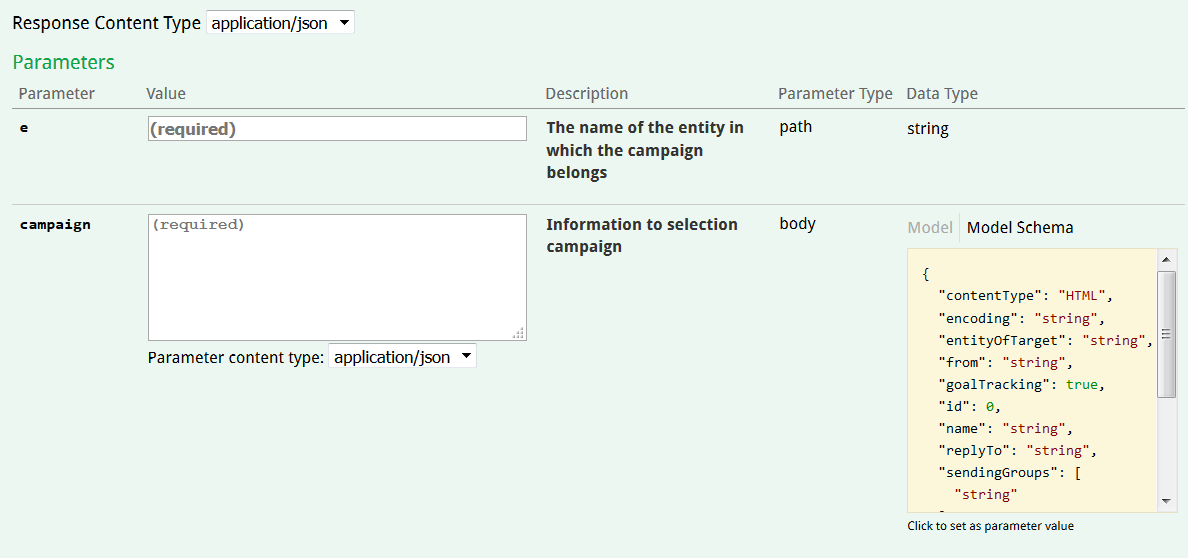
First of all, specify the entity on which this campaign will be created.
Next, the body of the request will need to contain the general parameters as JSON code:
"contentType": the default and only value is “HTML”. The creation of an e-mail campaign through API necessarily entails defining its content by importing a HTML file.
"encoding": the way the mail is encoded. For example, “UTF-8” or “ISO-8859-15”.
"entityOfTarget": entity of the profile table on which the e-mail is defined.
"from": sender of the mail, as it will appear in the e-mail header.
"goalTracking": if you have set up goals, defining this parameter as "true" will allows you to track goals triggered by that campaign. You therefore have to specify the id of this goal in the "id" parameter.
"name": name of the campaign. It will be the campaign name that will appear in the ACTITO. It can also be used as technical name in order to identify the campaign when making further calls.
"replyTo": when sending out an e-mail campaign, it is possible to indicate a reply-to address to which user replies will be forwarded. If this optional parameter is not specified, the default address in your license preferences will be used.
"sendingGroups" : this optional parameter can be used to list the sending groups to which the e-mail belongs. An e-mail is always assigned to a default sending group that resumes all e-mails from the same entity and the same profile database.
"supportedLanguages": the languages in which you want to send your campaign. At this stage, it is only possible to send a campaign in one language at once.
"targetTable": the name of the profile table targeted by your campaign.
Tip
The '/ ' character cannot be used in campaign names.
Example of request including JSON code and its response: (Download this example)
Curl callcurl -X POST --header "Content-Type: application/json" --header "Accept: application/json" -d "{ \"contentType\": \"HTML\", \"encoding\": \"utf-8\", \"entityOfTarget\": \"actito\", \"from\": \"Documentalist\", \"name\": \"DemoDocMailAPI\", \"replyTo\": \"replies@actito.com\", \"sendingMode\": \"MASS\", \"supportedLanguages\": [ \"FR\" ], \"targetTable\": \"DemoDoc\"}" "https://test.actito.be/ActitoWebServices/ws/v4/entity/actito/mail"Response body{ "campaignId": 223}The response to the request will be the auto-generated technical id, which will be used to identify the campaign while making further calls.
Defining the subject of an e-mail
After creating the basis of your campaign, you need to define its subject, such as it will appear in the header of your e-mail.
To do so, you can use the operation PUT/entity/{e}/mail{m}/content/subject
The parameters provided for this operation are:
the entity on which the campaign is stored
the id of the e-mail campaign: it can be its auto-generated id or the technical name that you defined at the previous step.
the subject of your e-mail: please note that it is not possible to insert a customization in this subject.

Example of a request and its response: (Download this example)
Curl callcurl -X PUT --header "Content-Type: application/json" --header "Accept: application/json" -d "Welcome to Actito" "https://test.actito.be/ActitoWebServices/ws/v4/entity/actito/mail/223/content/subject"Response body{ "campaignId": 223}The response to this request will be the auto-generated campaign id.
Defining the target of an e-mail
It is not possible to directly use the targeting module through webservices. However, it is possible to set up filters based on subscriptions and languages, as well as using a saved targeting.
You also have the possibility to define the targeting by importing a list of profiles identified by a unique attribute of your database.
As any campaign created through API is directly available in ACTITO, you retain the possibility to target your profiles via the targeting module of the interface.
Defining the targeting based on the language, the subscription or a saved targeting
To do so, you need to use the operation PUT/entity/{e}/mail{m}/target
The parameters provided are:
the entity on which the campaign is stored
the id of the e-mail campaign (id or technical name)
filters used to define the target of your campaign: they shall be provided in the request body as JSON code.
"filterOnLanguage": set as "true" to only target profiles whose mother language is the language of the campaign that you defined in the general parameters
"subscription": state the name of subscription whose subscribers you want to target. From a technical point of view, a subscription is not mandatory. From a GDPR point of view, the subscription is the explicit authorization given by a profile in order to be contacted. It should therefore not be omitted.
"targetingName": you can use a single saved targeting by referring to it with the name that you chose while creating it in the ACTITO interface. You will target every profile belonging to this saved targeting.
Example of a request and its response: (Download this example)
Curl callcurl -X PUT --header "Content-Type: application/json" --header "Accept: application/json" -d "{ \"filterOnLanguage\": true, \"subscription\": \"Info\", \"targetingName\": \"DocTargeting\"}" "https://test.actito.be/ActitoWebServices/ws/v4/entity/actito/mail/223/target"Response body{ "campaignId": 223}The response to this request is the auto-generated technical id of this campaign.
Defining the targeting based on a list
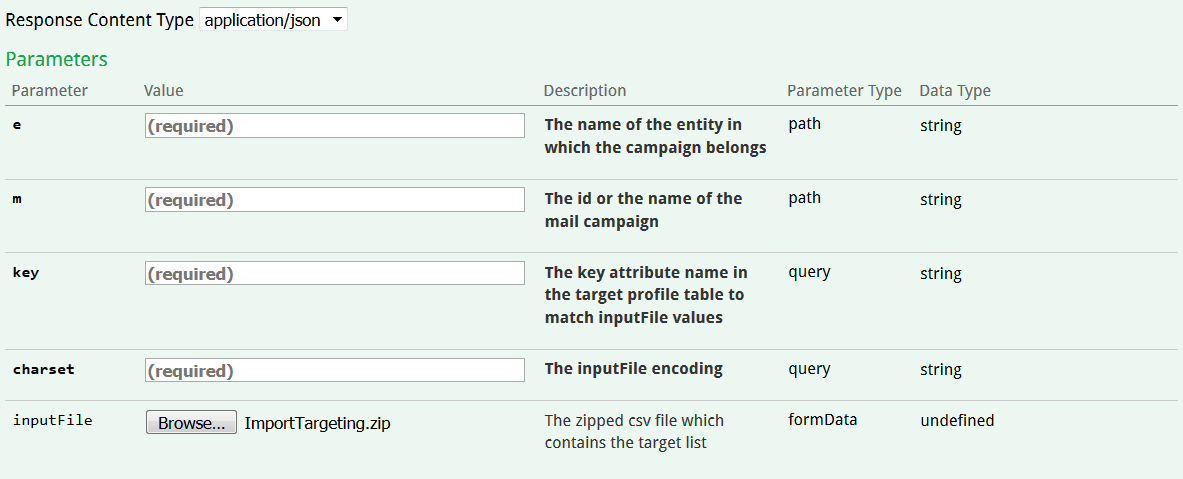
In order to define your targeting by importing a file containing a list of profiles, you can use the operation POST/entity/{e}/mail/{m}/target/list
To do so, you will need to import the list of the profiles that you want to target, by identifying them on the basis of a key attribute of your database ("profileId", client number, e-mail address, or any unique attribute).
You will need to define the following parameters:
the entity on which the campaign is stored
the e-mail campaign id (technical id or technical name)
"key": state the name of the unique attribute which will be used as key to identify profiles
"charset": this is the format of the imported file (for example, UTF-8)
"inputFile" this is the zipped CSV file with a single column without header that contains the value of the key attribute for each targeted profile. It must be submitted as multipart/form-data of the request.
The response to this request is the auto-generated technical id of this campaign.
Defining the content of your e-mail
The content of your e-mail can be defined directly through webservices. To this purpose, it mustbe set up as HTML content.
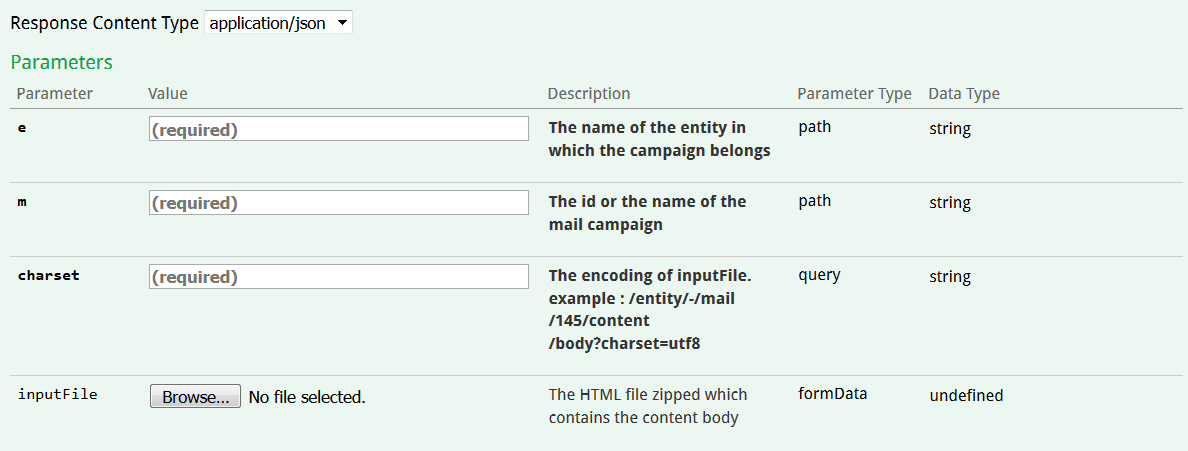
To define the content of your e-mail, you need to use the operation POST/entity/{e}/mail{m}/content/body
You will need to define the following parameters:
the entity on which the campaign is stored
the e-mail campaign id (technical id or technical name)
"charset": this is the format of the imported file (for example, UTF-8)
"inputFile": this is the ZIP file containing the HTML used to define your content
There are two possibles format for the imported content file:
a single HTML file containing the images in absolute (meaning that the images are hosted on another server)
a ZIP file, containing one or more HTML files depending on the number of languages defined for the e-mail campaign. In the case of a multilingual mailing, a suffix must be added to these files: ‘_’ followed by the language code in two letters (for example: '_FR'). The HTML files must be found at the root of the ZIP file.
Tip
It is advised to use one HTML file and one image folder per language.
The maximum weight of the ZIP is 4 MB. We advise that each image should not weight over 200kB.
Sending the e-mail campaign
Once your e-mail is ready, meaning that you defined its parameters, chose the target, designed the message, set up customization, and that you are pleased with your tests, you can proceed with sending your e-mail.
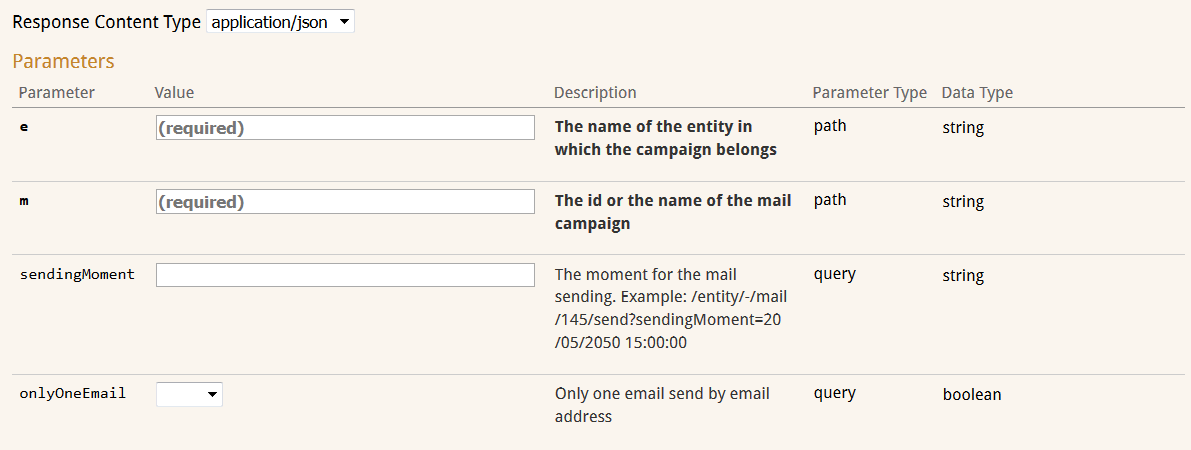
This is possible through the operation PUT/entity{e}/mail{m}/send
You will need to provide the entity on which the campaign is stored as well as the campaign id (auto-generated id or technical name). In doing so, the e-mail will be sent immediately.
Two optional query parameters allow you to modify the sending behaviour:
"sendingMoment": this allows you to plan your sending at a future date of your choice. For example, you need to use the following format: 22/05/2019 15:00:00
"onlyOneEmail": if the e-mail address is not a unique attribute in your database, the later may contain several profiles with the same e-mail address. Setting up this parameter as "true" will ensure that only one e-mail will be sent per e-mail address.
Example of a request and its response for a planned e-mail sending: (Download this example)
Curl callcurl -X PUT --header "Content-Type: application/json" --header "Accept: application/json" "https://test.actito.be/ActitoWebServices/ws/v4/entity/actito/mail/223/send?sendingMoment=22%2F03%2F2019%2011%3A00%3A00&onlyOneEmail=true"Response body{ "campaignId": 223}The response to this request will be the auto-generated technical id of the campaign.
Sending continuous campaigns
In contrary to mass e-mail campaigns, which are sent all at once, it is possible to program continuous sendings, which will allow ongoing e-mail sendings at a specific time for each profile.
Continuous campaigns work as a scenarized way in the sense that let you automate your e-mail sending on the basis of a trigger event. Unlike scenarios, which can be set up in ACTITO, the trigger event of continuous campaigns do not have to be defined in the interface. The e-mail sending will be directly triggered by a webservice call which you can program according to the purpose of your sending (for example, a welcome e-mail following a registration, a confimation e-mail following an order).
Contacting a profile with a continuous sending
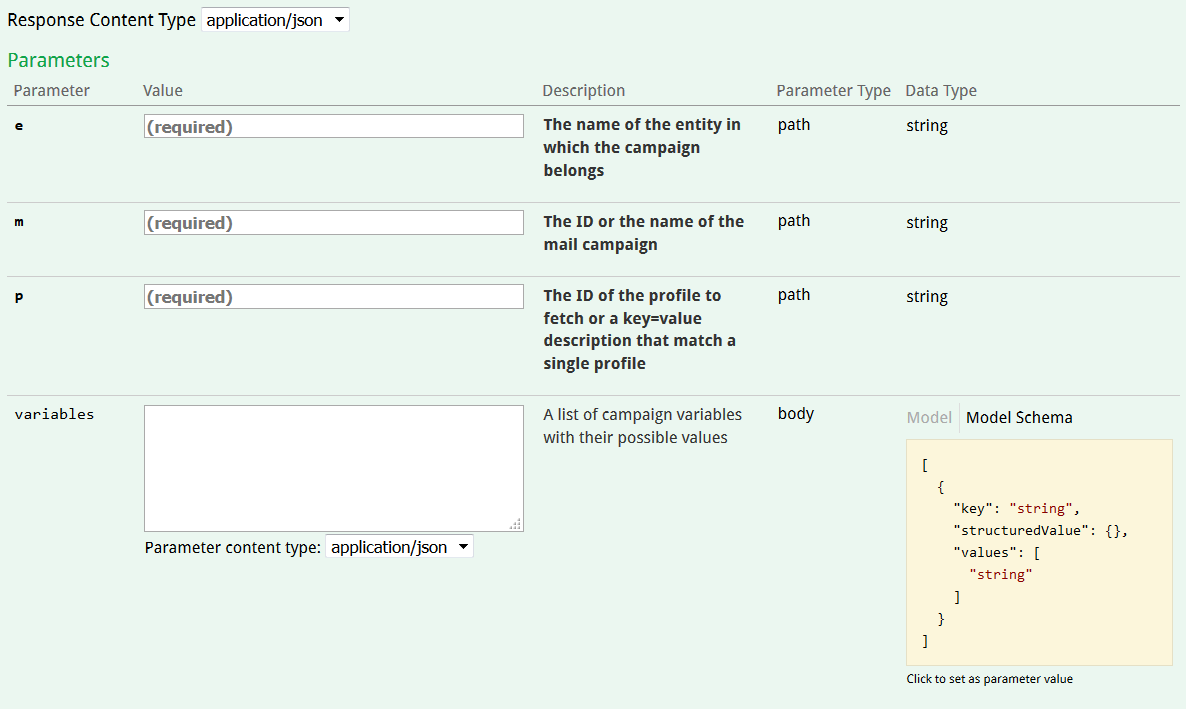
When a profile fits the conditions determined by the purpose of your continuous sending, the later can be triggered through the operation POST/entity/{e}/mail/{p}/profile{p}
You will need to specify the following parameters:
the entity on which the campaign is stored
the campaign id (auto-generated id or technical name)
the id of the targeted profile (profileId or "keyAttribute=value" pair)
variables:
Defining variables
In the body of your e-mail, variables should be defined like a normal customization, which with the '$' symbole following byt the customization name.
In the webservice call, they should be provided as 'key-values' pairs, where "key" is the exact name of the customization and where "values" stand for the value that the variable will take in the e-mail.
Example of a request and its response: (Download this example)
Curl callcurl -X POST --header "Content-Type: application/json" --header "Accept: application/json" -d "[{\"key\": \"amount\",\"values\": [\"128\"]}]" "https://test.actito.be/ActitoWebServices/ws/v4/entity/actito/mail/203/profile/1147695"Response body { "interactionId": "2631"}The response will be the id of the created interaction.
Obtaining interactions of a profile with a campaign
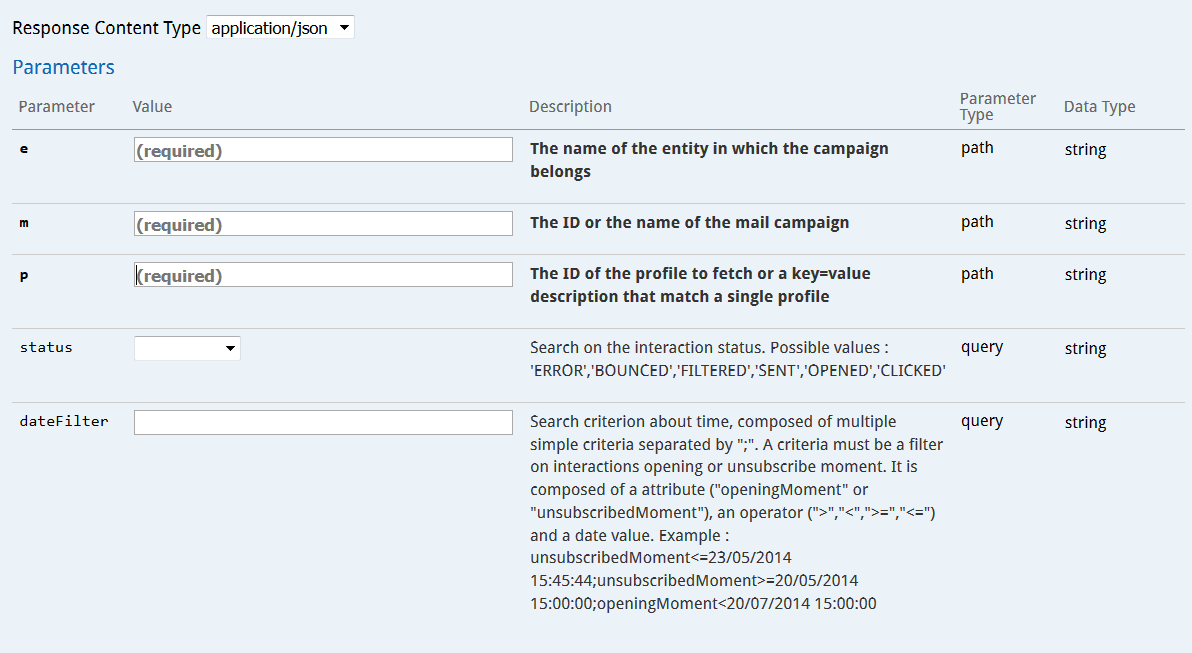
Any interaction between profiles and your campaigns are stored in ACTITO. It is possible to retrieve them for a given profile through the method GET/entity/{e}/mail/{m}/profile/{p}
The parameters needed are:
the entity on which the campaign is stored
the campaign id (auto-generated id or technical name)
the id of the given profile (profileId or "keyAttribute=value" pair)
a status filter: it allows you to only select e-mails with a specific status (in error, bounced, filtered, sent, opened, clicked)
a date filter: it allows you to filter based on the e-mail opening or the unsubscribe moment, with the help of an operator and the chosen date
Example of a request and its response: (Download this example)
Curl callcurl -X GET --header "Accept: application/json" "https://test.actito.be/ActitoWebServices/ws/v4/entity/actito/mail/223/profile/customerId%3D14895"Response body{ "mailInteractions": [ { "id": null, "interactionId": 2532, "profileId": 147475, "status": "BOUNCED", "creationMoment": "20190322110129", "openingMoment": null, "unsubscribedMoment": null, "numberOfClicks": 0 } ]}The response of the request will contain:
the id of the interaction (interactionId)
the technical id of the given profile
the e-mail status
the e-mail creation moment
the e-mail opening moment (if relevant)
the unsubscribe moment (if relevant)
the amountof clicks in the e-mail