Using Loop Personalizations
If you want to send e-mails for order confirmations or abandoned carts reminders, you will probably need to display several items. This is where loop personalizations come handy!
Loops are indeed very useful when you need to personalize with several lines of data.
Instead of replacing a personalization variable by a single value, it is possible to display:
-
A set of related values (for example, the article name and the corresponding amount).
-
Several of these sets one after the others (for example, the last 3 purchases, each of those being characterized by the article name and the amount).

Loops are available both in marketing and transactional e-mails.
Format of the e-mail
The way to insert a loop depends on whether you are creating your e-mail with the template editor or by importing an HTML.
Loops in the template editor
Loop personalizations can be used in a template by using specific loop blocks.
These compatible blocks are identified by the "loop" icon when you select them, next to the condition icons.
There are 2 ways to insert them:
-
From a custom design template: if you have ordered a custom template designed by the Actito team, you may have requested a loop block directly in the template.
-
From the module library: in all other templates, you can use the library of modules, where a selection of loop blocks are available with different designs (with images, CTAs,...)
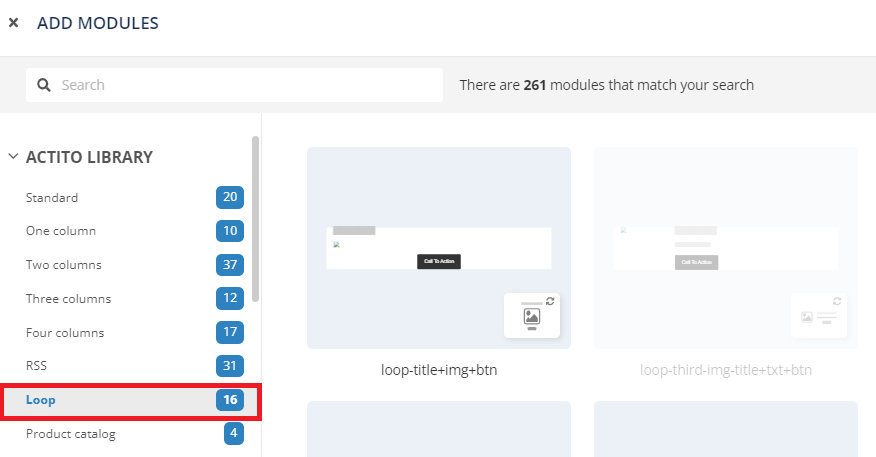
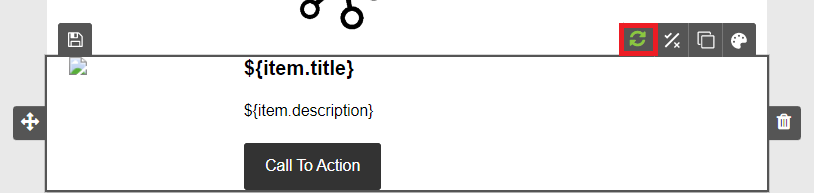
The blocks from the module library come with a pre-defined loop called "item".
By clicking on the loop icon in the block, you can declare another name for your loop.

The name of the loop is important, because each element of the loop needs to follow the format: ${loop name.element name}.
For instance, in the screenshot above, the loop is named "item" and ${item.title} and ${item.description} are elements of the loops, where "title" and "description" are variables that will be personalized each time the loop is repeated.
Some personalizations are already defined in each block but you can update them or add extra elements, by following the ${loop name.element name} format. For instance: ${item.price}, ${item.quantity},...
You can change the layout and apply styles to the elements of your loop as you see fit.
If you provide personalization values by API (see last section), you will need to refer to the technical name of the loop in your call, which is: the name declared in the loop block + S.
For instance, in the loop above named "item", the technical name called in the API would be "items".
Loops in HTML imports
Loop personalizations can also be used in your imported HTML files by inserting the code snippet made for this purpose.
You will need to use the parameter "data-Actito-each" and to define it as "loop name: ${loop name in plural}". For instance, data-Actito-each ="example:${examples}"
Each element of the loop needs to follow the format: ${loop name.element name}. For instance: ${example.element}
Let's take a practical example:
We want to display a loop containing the last purchases made by
contacted profiles and, for each one, to display the article
name and its price.
You would need to insert the following
piece of code:
<div data-Actito-each="item:${items}">
<span> Article: ${item.article} </span>
<span> Price: ${item.price} </span>
</div>
"Loop name in plural" is simply a suggestion when declaring the second element of the "data-Actito-each" parameter. You can declare another technical name of your choice, as long as it's different from the first element.
For instance: data-Actito-each ="purchase:${example}".
However, please keep it in mind if the personalization values are pushed by API, as the name declared in the ${ } part (here "example") will be used to refer to the loop in the API call.
Personalization parameters
After setting up your loop in a specific block or in the HTML, you have to parameter all the variables used in the loop personalization.
To do so, go to the personalization management modal window.

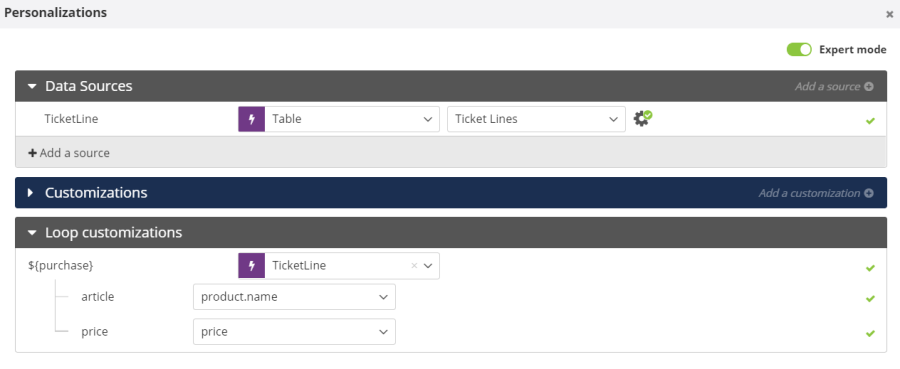
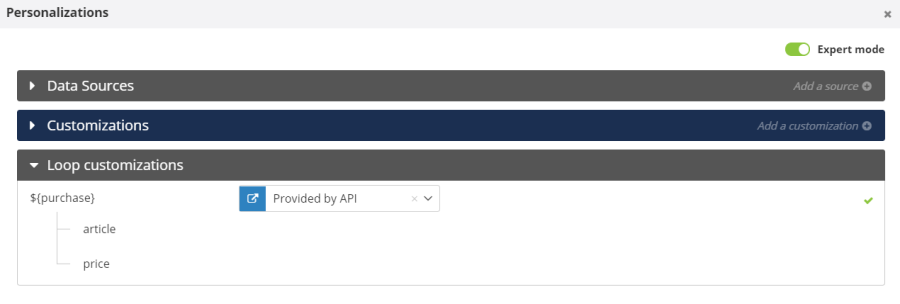
To reach the loops, you first of all need to activate the "Expert mode" at the top right of the screen. A new section called "Loop personalization" will appear.
The value for each element of the loop can be provided by
two types of sources:
-
From tables of the Data Model (Custom tables): you will need to select the relevant table beforehand in the "Data Source" section.
-
Via API : please see the end of this chapter for additional information on how to use loops via API.
If the "Loop personalizations" section appears in the interface but does not display anything when you expand it by clicking on the small arrow, it means that the system acknowledged your attempt to set up a loop, but your HTML is incorrect. Check your code, the name of the loop and of the variables.
Loop values from the Custom Tables
Value definition
After selecting the source, you can define the values taken by the variables on the loop, in the "Loop personalizations" section.
Select the data source chosen during the preliminary step and assign it to the name of the loop. Each loop can only use one data source.
Next, link the various elements of the loop to the fields of the source table.
Defining the number of displayed elements
In addition to letting you display a set of values, loops also enable you to display several of these sets one after the others.
You need to specify the number of elements that you want to display. Without additional parameters, the loop will call every entry of the data source.
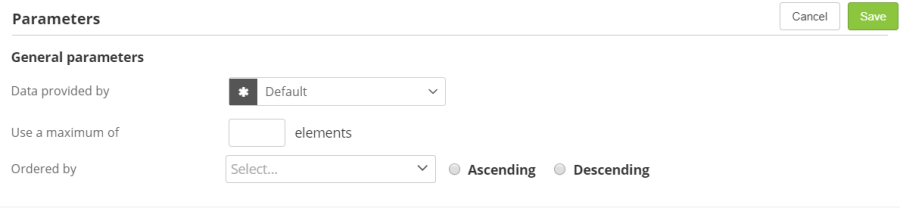
To do so, you need to go to the Data Source parameters, by clicking on the cog icon to the right of the data source line.

You will be able to display:
-
The maximum number of displayed elements
-
What will be the sorting order of the elements and on the basis of which attribute of the source table.
It is also possible to add a filter to the source. In doing so, the only elements of the source taken into account are those which match the criteria you defined based on attributes of the table and aggregates calculated on them.
Tip
You can also choose the data
Provided by the scenario:
this option should be used for your scenarized
sendings when the start block of the scenario is related
to the value of the personalization (For example, if the
scenario is triggered by a ticket creation). This will
ensure that the information which triggered the scenario
and the information used in the personalization are the
same.
This option is only available for scenarized
sendings (including transactional).
Next, save your parameters in the top right corner.
A
green 'V' on the cog icon will confirm that the source has
been parametered.

Constraints
Loops cannot be used with multi-values attributes.
It is not possible to define default values in loops.
Loops triggered by API
In addition to Custom Tables, personalizations values be provided by API when the e-mail is triggered by a system external to Actito.
To use APIs as data sources, you need to assign the option "Provided by API" to your loop personalization in the personalization management modal window. No further mapping is required in the interface, as it will be made in the API call.
During the last step, make sure to click on "Activate
sending", to make the campaign available to trigger by API.
Testing 'provided by API' variables
As the final e-mail will the triggered by an API call, it might be relevant to carry out tests together with one of your developers.
Nevertheless, Actito gives you the possibility to test your e-mail directly in the interface, without involving technical resources.
If you use a personalization 'provided by API', an additional button will indeed be automatically displayed at the 'Check and test' step.
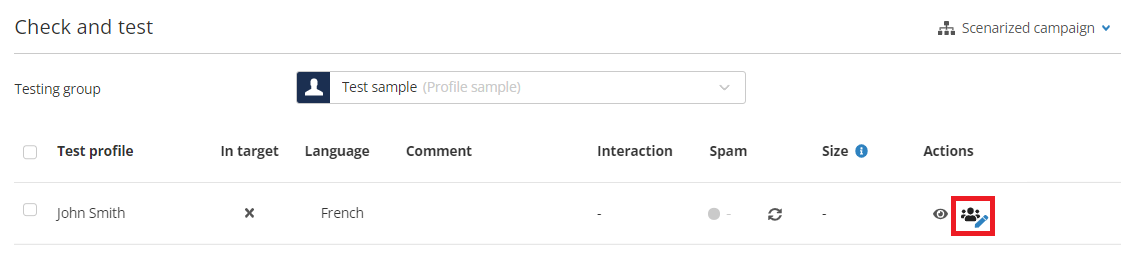
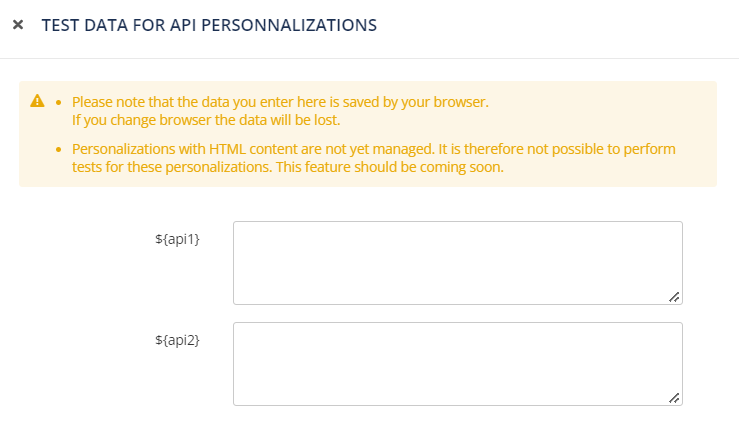
It lets you simulate test values for your personalizations, so that your test e-mails really use data to validate their final rendering.
These data are stored in the cache of your browser. They therefore do not appear in another user edits the campaign, or if you change session.
Triggering an e-mail via API
To trigger an e-mail and push loop personalization values by API, the call you can use depends on the type of the e-mail:
-
For standard scenarized e-mails (such as abandoned carts reminders), use the call POST /entity/{e}/mail/{m}/profile/{p}
-
For transactional e-mails (such as order confirmations), use the call POST /entity/{e}/transactionalmail/{m}/contact
You will need to provide the following parameters:
-
The entity on which the campaign is stored
-
The id of the campaign (auto-generated Id or technical name)
-
The id of the targeted profile:
-
in the path of the call for standard scenarized e-mails
-
in the body of the call for transactional e-mails, because the profile can be created/updated at the same time in this case
-
-
Variables:
-
For standard scenarized emails, the body of the call is just an array containing the personalizations values.
-
For transactional e-mails, the body of the call contains both a "profile" section, where you can push the values to create/update the profile, and a "parameters" array containing the personalizations values.
-
The array containing the values of the variables of your e-mail must be made of:
-
"key": You always need to specify "externalData" to trigger a loop via API
-
"structuredValue": The "structuredValue" parameter is mandatory for using a loop, unlike standard personalization where simple "values" are pushed. The "structuredValue" is an object containing the 'technical name' of the loop. This 'technical name' depends on how you declared the loop in your e-mail:
-
If you inserted it in your HTML code, it is the second element in the declaration of the loop: the value between curly brackets. It is "items" in the following snippet: data-actito-each="item:${items}".
-
If you inserted your loop in a block of a template, it the name of the loop as defined in the editor, with an S suffix. With this loop, named "item" in the editor, the value used in the API would be "items".
-
You can then define an array of objects containing the elements of the loop as pairs of "elementName": "value".
The loop will be repeated for each object pushed in the array, with the relevant set of values.
[{ "key": "externalData",
"structuredValue": {
"items": [{
"article": "Screwdriver",
"price": "25"
}, { "article": "Hammer",
"price": "32"
} ] }}]Simple personalizations (not part of a loop) are pushed through "key" - "values" pairs, where "key" is the name of the variable as defined in the e-mail.
See the request sample of the Trigger a transactional e-mail call for a great example of how to push both simple personalizations and loops in the same calls (+ the attribute to create/update the profile in case of a transactional sending).