Getting Started with Transactional Campaigns
Transactional campaigns are non-promotional messages which are triggered by an action performed by the customer. See the introduction for the full scope of the transactional offer.
In this article, we will detail the steps you should go through for a successful set-up that allows you to use the full potential of Actito's offer.
Before sending your first transactional campaign, a
configuration must be made by the Actito teams.
Please get
in touch with Actito support or with your Account Manager, who
can explain the modality of using the Transactional Module.
Setting up the Transactional Channel
Once our teams are informed that you want to activate the transactional module, Actito allows you to be highly independent to set up your channel, by going through the instructions below.
Nevertheless, if you want a more personal guidance, we invite you to discuss the possibilities with your account manager.
1. Configuration of the Sending Domain and IP
Transactional e-mails are sent through a specific, unfiltered
channel. The sending domain used to send
transactional
e-mails must be dedicated to that
channel, and therefore different than the one used for marketing
e-mails.
Even if your licence is already configured to
send e-mails campaigns, it will be necessary to go through the
delegation process with our deliverability team (with whom
you’ll be set in contact once confirmed with your account
manager that you want to activate the module).
On your side, you'll need to choose a sending domain:
-
Your transactional sending domain cannot have been used before.
-
You will need to delegate this domain to Actito
To delegate your sending domain to Actito, please follow the guide: Delegation Guide for Domain Configuration.docx
On Actito side, our teams will parameter your transactional domain on a dedicated transactional IP and activate ITM in your license.
If needed for your domain configuration, our deliverability experts will contact you directly.
While we are configuring your domain and IP, you can already start working on the following steps, but you will need to wait for the greenlight of our deliverability team before sending transactional campaigns.
If you chose to activate transactional SMS as well, our teams will configure your SMS channel for transactional usage at the same time. It is done entirely on Actito side and does not require your intervention.
2. Setting up your Data Model for Transactional campaigns
To send a transactional campaign in Actito, the recipient must be stored in a profile database.
There are two possibilities regarding the model used for transactional:
-
Using your existing Data Model, also used for marketing campaigns
-
Setting up a stand-alone profile table dedicated to transactional messages
We tend to recommend the second option: setting up a dedicated transactional database. It usually makes the implementation and future usage easier.
Nevertheless your choice should be guided by the existing constraints on your existing Profile Table and by the usages you want to make of transactional campaigns.
Using your existing data model
This is interesting if you want to have a fully integrated data model that combines all your communication channels. It means that:
-
All your data is centralized in one profile table, mixing marketing and transactional communication, and optin information.
-
All your reporting is aggregated across both channels and all interactions are centralized on one individual profile.
On the other hand, this solution presents the following challenges:
-
The system that triggers the transactional message will need to know the main key for each profile to contact.
-
This makes the use of any key other than the emailAddress/gsmNumber impractical (like a customerID). For instance an e-ticket in a supermarket will not necessarily be associated with an ID in your CRM, and likewise if you allow guest orders on your e-commerce platform.
-
This makes it harder to use both transactional e-mails and SMS.
-
-
Purely transactional profiles can be opted-out of your marketing communications and an action (opening, click) in a transactional campaign might not reflect an interest for your marketing campaigns, and might impact the result of targetings based on activity or recency.
-
Because they are expected, transactional usually enjoy a greater opening rate. An aggregated reporting can therefore skew the stats of your marketing campaigns.
With all these points considered, we recommend to use your existing Data Model only if:
-
You only need to send transactional e-mails and not transactional SMS.
-
The emailAddress is the unique key of your profile database.
-
You want an aggregated reporting with all profile interactions at once.
Overall, setting up a dedicated transactional database remain the recommended method, but it should be the only method considered if you do not match the above criteria.
If you want to display trans-promotional content in your messages, namely adding a block of 'commercial' content for your opted-in profiles, we advise you to contact your account manager.
Formatting an existing database
If you decide to use your existing profile table, you do not have to create anything. You should simply take note of the technical name of the key that will be used to trigger campaigns to communicate it to your IT teams if you plan to use the API.
Setting up a dedicated transactional database
Using a separate database dedicated to transactional campaigns is our recommendation in most cases.
Indeed, with a dedicated transactional DB:
-
Profiles can be created at the same time as the trigger of your e-mail through the dedicated API call.
-
It does not require to know any additional key (like a clientId). The key(s) of the dedicated database will be the contact information: the e-mail address (and/or the mobile phone number).
-
This facilitates the trigger of the message if the source of the transaction does not have this information at their disposal (for instance, an e-ticket in a supermarket will not necessarily be associated with an ID in your client base or your CRM).
-
The implementation is therefore easier for your IT team.
Overall, if the key of your main Marketing database is an external ID, and if there is any source of transactional e-mail that might not have this information at hand (guest order, e-ticket, password reminder,...), a dedicated database is the way to go.
The main perceived drawback of having a separate DB is that your profile information is not aggregated. However, this is not necessarily a bad thing.
Indeed, a purely transactional profile might not be opted-in and might not hold as much qualified information because it is created on the fly. They might not be an as relevant target for your marketing communications, so a separate profile table can help get more relevant targeting results.
Even if you create a dedicated DB for transactional campaigns, the details of the transaction (Orders, Tickets,...) can still be integrated in the Custom Tables of your main marketing Data Model, after having been reconciled with existing profiles through your CRM and when there is no real-time constraint for the synchronization.
Do not hesitate to contact your account manager if you need assistance in setting up such data flows.
Creating a transactional database
With this option, you are using a separate database that is only used for transactional, so you need to create a new profile table.
This is very easy to do in Actito thanks to the 'Manage DB structure' app (More information in 'Creating a Profile Table').
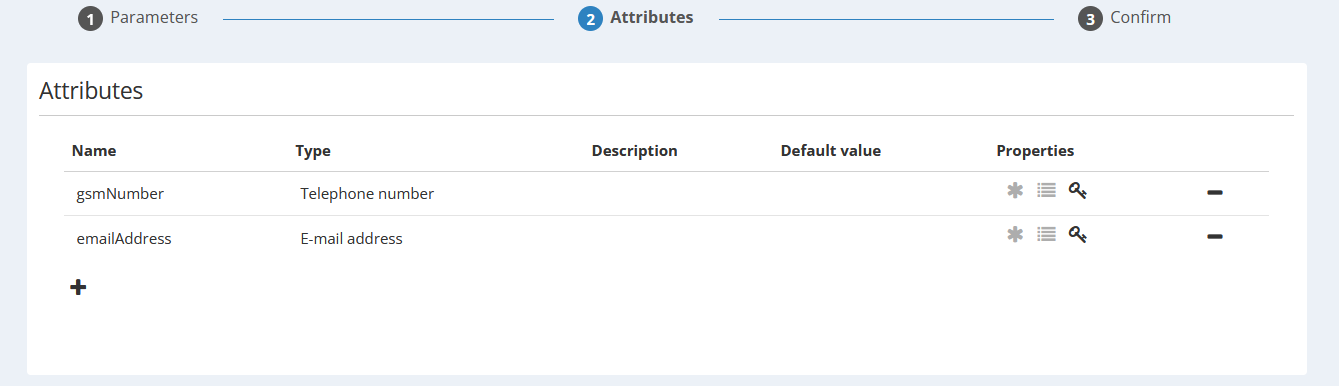
Create 2 new attributes that will be both unique and optional.
emailAddress
-
gsmNumber (if sending transactional SMS)
The same individual can therefore match 2 profiles for the 2 different channels. This is normal (because both attributes are non-mandatory) and intentional, so that each channel can be triggered through its own contact information, without needing to know the other information (i.e., the source of a transactional SMS does not need to know the e-mail address of the contacted profile).
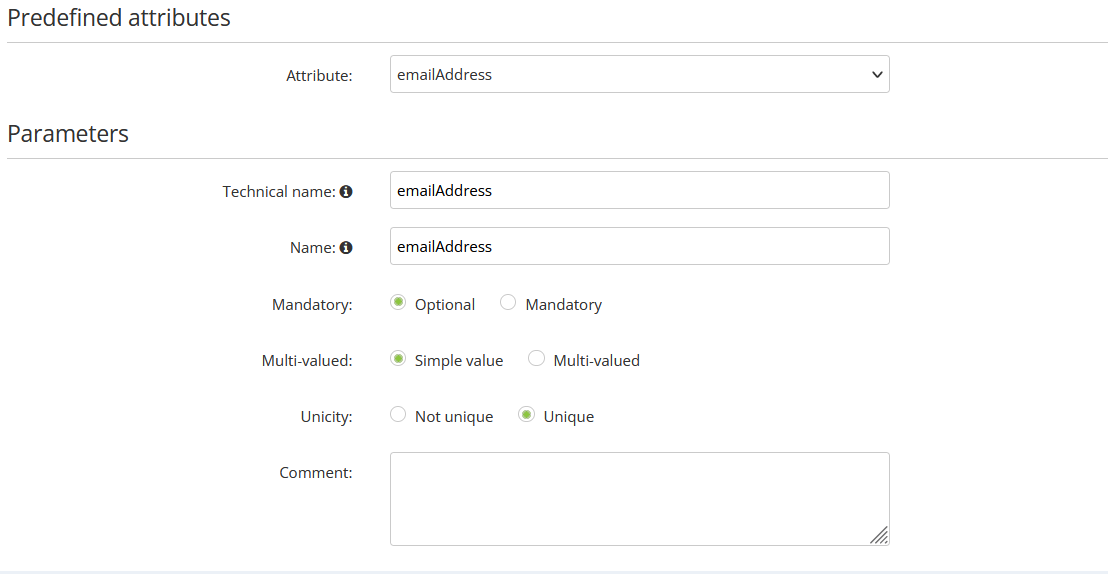
When you 'add an attribute', select 'Create new attribute', then select the predefined attributes 'emailAddress' or 'gsmNumber' in the dropdown list and change the unicity/mandatory parameters accordingly.
It is necessary to base your fields on the predefined attributes because they are correctly formatted for routing purposes.
That's it, your transactional DB is ready to be finalized!
Take note of the technical name of your fields for your developers.
It is possible to create additional attributes for personal information (name, first name,...) if you want to store this information in the database, but it is not required if you are using API to trigger your e-mail, because such information can be pushed dynamically in the trigger call.
You do not have to create any subscription in your DB, as transactional sendings do not require opt-ins.
3. Setting up transactional campaigns
When the transactional channel have been configured by our teams and when your data model is ready, you can now start to create your transactional campaigns.
Setting up a transactional e-mail
Once your transactional sending domain has been set up, you will be able to create transactional e-mails in the 'Manage e-mail campaigns' app.
If you want to already work on the design of your e-mail while your domain is being set up, you can create your campaign as a 'scenarized' e-mail and change its type later.
However, you won't be able to route it until you received the greenlight of our deliverability team.
You will be able to fully design your e-mail with all the features available in the Actito campaign editor.
For detailed information about the creation of your transactional e-mail, have a look at the article Creating a Transactional E-mail.
Transactional campaigns need to be created through the Actito interface.
4. Triggering a transactional campaign
Once your transactional campaign is active and your routing configuration is completed, your campaign is ready to be triggered.
There are 2 ways to trigger a transactional campaign:
-
The dedicated API calls
-
The Scenario app
The API calls will usually be the most practical solution:
-
The transactional API calls allow to both create (or update) a profile and send them a campaign at the same time.
-
Due to the real-time nature of transactional campaigns, the link between the source of the 'transaction' and Actito often needs to be implemented programmatically by your developers without any delay or reconciliation in your CRM.
-
Triggering the campaign by API allows to directly push personalized information in the call, which is useful if all the necessary information are not stored in the Actito datamart (for example, the reset link in a password reminder e-mail).
-
If you are using a dedicated transactional database, the API calls are especially the way to go, because you probably won't have custom tables linked to this database.
Nevertheless, it is possible to trigger transactional campaigns thanks to the Actito Scenario app.
-
This is particularly useful if you send transactional campaigns on your existing main database and import transaction data in the custom tables of your data model:
-
You can trigger your scenario when a line is created or updated in one of your interaction tables (Orders, Tickets,...).
-
-
This is also used if real-time is less of a constraint. For instance sending a shipping confirmation at the end of day when the "Status" of an order is updated from "CONFIRMED" to "SHIPPED".
-
Scenarios allow you to build complete workflows, like re-sending a confirmation that hasn't been opened, or sending a (scenarized) satisfaction e-mail 1 week after an order.
For detailed insights on how to trigger your campaigns, please see Triggering a Transactional Campaign.