Creating a new E-mail campaign
To create a new e-mail campaign, go to the 'Manage e-mail campaigns' application ( Catalog > E-mails > Manage e-mail campaigns).

Click on the '+ Create a new campaign' button.

Choosing the campaign type
Next, you will have to choose the type of campaign that you want to create.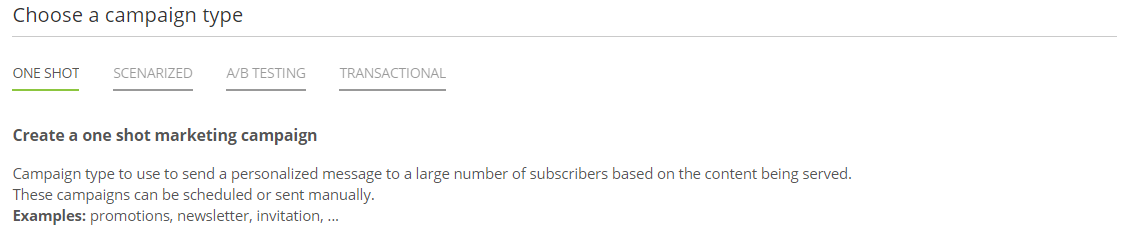
There are 4 different types of campaigns :
One shot: This type of campaign is sent at given time to a great number of profiles all at once.
Scenarized: This type of campaign can be triggered automatically via Scenarios or via API.
A/B Testing: This option enables you to test several versions of your e-mails and to easily find out which version is the best performing. For more details, read the chapter on 'A/B testing'.
Transactional: This option enables you to set up continuous campaigns routed without any filter towards the destination address. It is only available if the licence is set up to allow this kind of campaign. Fore more details, read the chapter on 'Transactional e-mails'
This is also at this step that you will have to choose the creation mode of the e-mail.
From blank: by choosing this mode, you will have to define the e-mail from A to Z. You will have the choice between basing the content on a template, or code it in HTML.
From a saved campaign template . Only templates for the chosen type of campaign will be displayed.
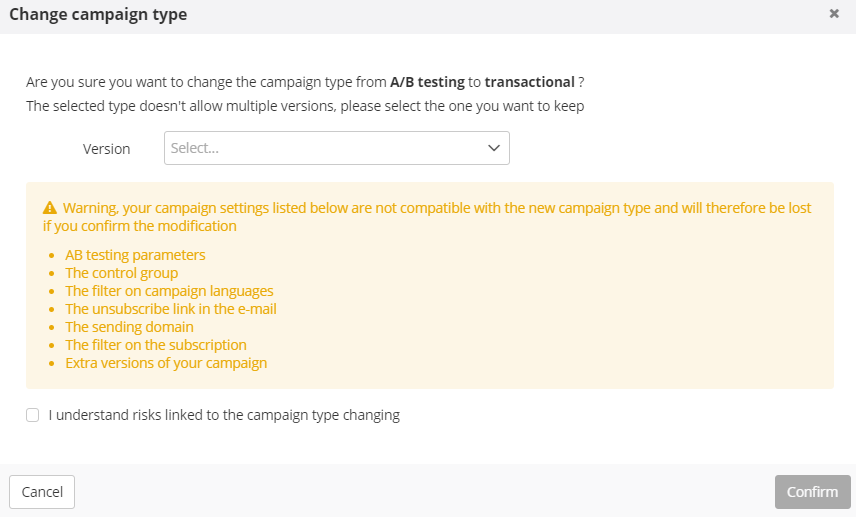
Modifying the campaign type
If you chose the wrong campaign type, or if, for instance, you want to copy an existing one shot campaign to use in a scenario, it is possible to modify the campaign type.
After every step of the campaign creation, a button in the top right corner will :
remind you of the current campaign type
give you the possibility to switch to another campaign type

Please note that some parameters are not compatible with other types. For example, there is no Targeting step or unsubscribe link in a Transactional e-mail, and personalizations provided via API are only available for Scenarized and Transactional e-mails.
A warning screen will detail the parameters that will be lost in the switch. You will be required to acknowledge them before going forward. Please note that reverting to the original campaign type afterward would not restore these parameters.
If your original type is 'A/B testing', you will be able to choose which version you want to keep.
Step 1: General data
At this step, you will be able to define the base data of your e-mail campaign.
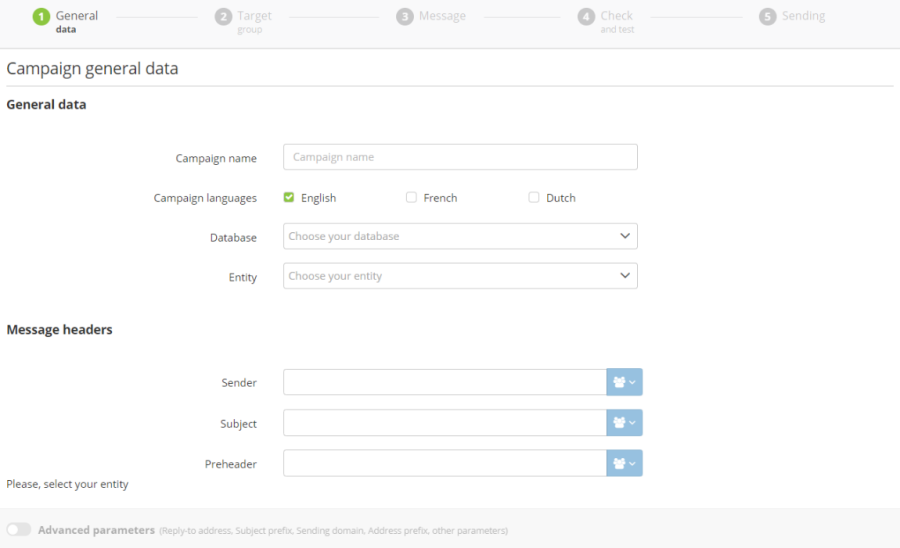
General Data
Campaign name: Specify the technical that your sending will take in ACTITO. This will have no impact on the text that the recipients will see.
Tip
We advise you to use a naming convention clear to every team (for example: dateCampaignName).
Campaign languages: Choose the language(s) of your campaign.
Tip
ACTITO allows you to prepare a single campaign and to translate it in several languages, as long as your licence is set-up for multi-lingual use. Please note that modifying language parameters while editing your message can affect already created content.
Database: Specify on which profile database you want to send the e-mail campaign. If you have several databases, you will be able to choose from a dropdown menu. Each campaign can only be sent to a single database
Entity: specify the entity on which the campaign must be stored.
Tip
An entity is a subdivision of your ACTITO licence which allow to differentiate users' rights. There is only one by default
Important notice
Please note that after validating the entity and the database, they cannot be modified anymore.
Message headers
Sender: Specify the name which will appear in the inbox of the recipient of your e-mail (the 'from')
Subject: Enter the object of your e-mail campaign
Pre-header: The pre-header is used to complement the information in the object. This element is not mandatory but its influence on opening rates should not be underestimated. It will appear in the inbox of your contact. The new e-mail engine lets you set up the pre-header directly while defining the general data of your campaign.
Customizations in the headers
It is possible to add customizations in the message headers by clicking on the blue button next to each field.
This will allow you to customize the text by using a profile value for each of your profiles.
In the headers, customization is only possible on profile attributes and on technical values.
Advanced parameters
It is possible to define additional parameters regarding the campaign technical configuration. To do so, click on the On/OFF button at the bottom of your screen: this will display the list of advanced parameters.
This ON/OFF button is only available after specifying the entity.
The advanced parameters are organized in the following sections:
1.E-mails reply: You can specify a 'reply-to address' and a subject-prefix specific for this campaign.
a. A reply-to address is the address where you will receive all the replies to your campaign. It's important to verify that this kind of emails are allowed by your webmail, so that they are not filtered.
If no reply-to address is specified, you will not receive any replies from your contacts
There are two options regarding e-mail replies :
-If Tracking replies is ticked ON
When someone replies to your campaign, they won't see your reply-to address, but a unique address for the interaction (made of your licene name and a string of characters).
Indeed, the reply will transit through an Actito server, which will enable Actito to update the profile interactions and indicate that they replied to the campaign.
Following that, the Actito postmaster server will transfer the e-mail reply to your selected reply-to address.


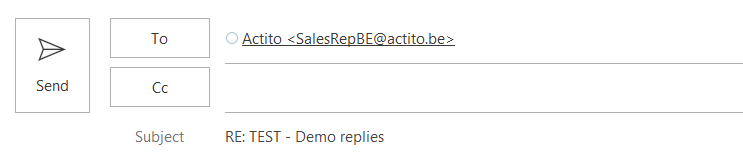
In this example, the reply will be sent to 'support@actito.com', although, when writing the reply, the user will see the unique interaction address, in this case 'sales_training_rsctw-sht@campaign.actito.email'.
-If Tracking replies is ticked OFF
Actito will not track replies, meaning that the information whether a profile replied to the campaign will not appear in their interaction.
However, the address that will appear when someone replies to your e-mail campaign will be directly your reply-to address, without intermediary.
Additionally, when replies are not tracked, it is possible to use a personalization, for example to directly transfer the reply to the appropriate customer representative.

In this example, the user will see the value of the personalization (it must be a valid e-mail address) and the reply will be sent directly to this address.
Subject prefix: It's the prefix that will appear on the reply email subject.
If your campaign's subject is 'Season essentials' and your reply prefix is your 'Enquiry', the subject of the reply that you receive will be 'Enquiry - Season essentials'.
Sender e-mail address: You can specify a sending domain and an address prefix for your campaign.
Sending domain: You can choose among the sending domains available in your licence.
Address prefix : When a fixed "from" is in place for your license, this option allows you to replace the sending prefix (which is the part of the e-mail address before the @) by a specific value chosen for this campaign
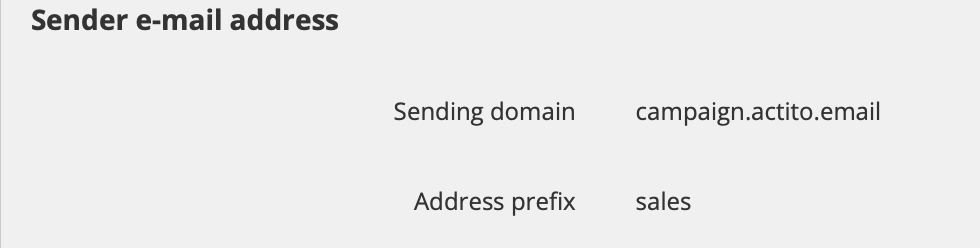

Please note that special characters are not allowed and that a maximum of 20 characters is allowed.
Tip
If you would like to have a default fixed "from" configured for your license, don't hesitate to contact Actito support.
Links: You can select the domain of the links of your e-mail among the domains available in your licence.
Impact on commercial pressure:If you have commercial pressure rules in your licence, you can specify the weight of your campaign. By default, the e-mail is recorded normally, but it is possible not to record it (such as for transactional e-mails) or to record them double if it is a high impact e-mail.
Campaign groups: You can add this campaign to an existing campaign group.
Tip
Grouping similar campaigns together allows you to analyze the results of this campaign group as a whole.
Goal tracking
In the new e-mail engine, it is no longer necessary to activate the goal tracking for your e-mail campaign. If there are existing goals related to the target database, goal tracking will be activated automatically.
Step 2: Target population
This step allows you to choose with whom you want to communicate.
Subscription and languages
As aspects related to subscriptions are paramount, it is mandatory to specify them.
Next, you will be able to choose which unsubscribe scenario is used.
E-mails will only be sent to profiles whose language (defined by the 'motherLanguage' attribute) was chosen for the campaign at step 1, unless you uncheck the 'Language' box.
In this case, you can select a default language. This will allow you to contact profiles whose language is not included in the languages of your campaign.
You must ensure to always have the authorization of your contacts to send them communications. You must therefore specify the subscription taken into account for this campaign.
As a result, only profiles subscribed to this subscription will receive this campaign. If a contact unsubscribes following this campaign, only the subscription related to it will be impacted.
Additional filter on target population
You can define additional filters to limit the target population. To do so, click on the 'Define a filter' button. The targeting module will open in a pop-up window. Comprehensive explanation regarding this module are available in the 'Targeting' chapter of the online documentation.
Number of profiles in the targeting
After setting up your filter, you can calculate the number of profiles targeted.
By clicking on the 'Calculate' button, you will launch an estimation of the target. You will therefore obtain the number of people who match your criteria and to which the e-mail will be sent.
Filters applied at sending
If there are commercial pressure rules in your licence:
The filter of commercial pressure, which you defined at the previous step, is not applied by default. If you want to take into account your commercial pressure rules, it is necessary to check the relevant box.
Please note that the commercial pressure filter will not be applied in the target estimation
If the e-mail address is not a unique attribute in your database:
It means that several profiles can have the same e-mail address. Check the box "Send only one e-mail by e-mail address" to avoid sending the same e-mail twice. The profile (and therefore the customizations applied to the message) will be selected randomly.
Step 3: Message
During this step, you will be able to choose the creation mode of your new e-mail campaign:
The available options are:
Create from template
A template library is provided by ACTITO. This is the simplest option, which does not require knowledge of HTML. For a detailed explanation about this option, we invite you to read the chapter on "Creating an e-mail via a template".
Import HTML
You can import either:
An HTML file, which contains images in absolute (hosted on a third party server)
A ZIP file, containing one or more HTML files according to the number of languages in the campaign. It is advised to use one HTML file and one image file per language. The maximum size of the ZIP is 4 Mo. We advise that each image should not weight over 200 ko.
Code your own HTML
When you choose to code your own HTML, the basis of the code will be provided. This will predefine the encoding and the style of your e-mail.
Tip
Even if you choose to import or code your HTML, it is still possible to use customization in ACTITO. You only need to use the appropriate $ tag.
Customizing the message
ACTITO lets you customize your e-mails in order to display text elements specific to each of your contacts. This can call on attributes of the Profile table, but also on various other data.
To insert a customization, type the $ tag followed by the name of your customization between curly brackets (for example, $firstName) where you want your customization to appear in your message. When the recipient will receive the e-mail, this tag will be replaced by the corresponding value for their profile.
For detailed explanations about customizations in e-mails, we invite you to read the page on "Customizing or Conditioning an E-mail".
Tip
It is not allowed to use special characters or spaces in the technical name of customizations. For instance, ${firstname} must be used instead of ${first name}.
Check links
After writing your message and defining customizations, it is necessary to go to the link checking step.
To do so, click on the "Check links" button in the message preview screen.

You will reach a new page which will contain the list of every link found in your e-mail.
This list includes:
The link of the text
The URL of the link or the customization towards which it directs (in the case of a form or an unsubscribe link)
The name of the link: this is the name which will appear in the reporting
The status of the link: an icon to the left tells you
Green icon: the link is working properly
Red icon: the link directs to a page that cannot be found
Grey icon: This is a technical value that cannot be tested (for example, an ACTITO URL of a form, the webversion or the unsubscribe link
Tip
A red status does not necessarily indicate a 404 error. Other reasons are possible, for example if authentication is needed to reach the page, a pop-up blocks access to the page or if the url has special characters but was not percent encoded.
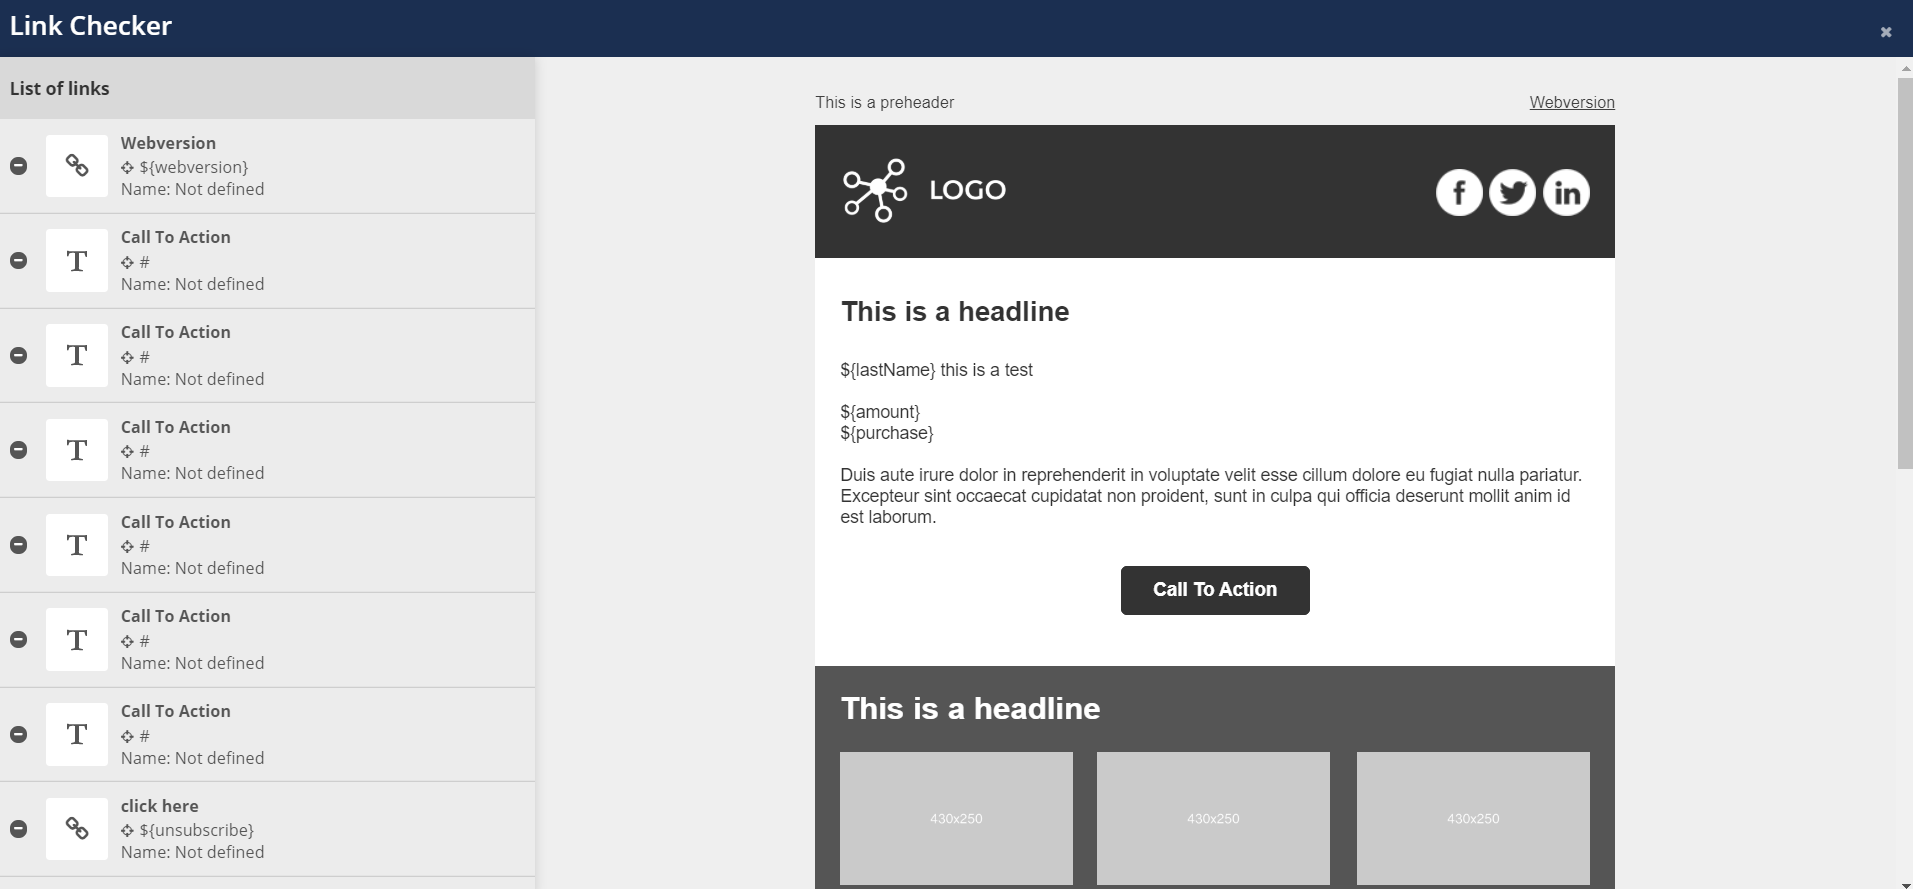
Hover each link in the list to the left to highlight its location in the e-mail.
Click on each link to define their name. This technical name is different from the title of the link. It is used in reporting. It will help you differentiate each of these links in order to easily find them in statistics related to each campaign. If you leave the name of the link empty, the full url will be displayed in the sending report.
You do not need to click on the small "pen" icon to edit this link. Clicking on the tab of each link is enough the technical name settings.
Tip
To facilitate the analysis of clicks in your e-mails, each link should have a different name. However, if there similar links between campaigns, it is better to keep the same name in order to be able to carry out a global analysis (for example: pre-header, facebook,…).
After checking all your links, click on the X in the top right corner to leave the link checking screen.
Additional url parameters
After the creation of your message, you will be able to set up the additional url parameters.
They allow you to define generic parameters of web traffic analysis tools, such as Google Analytics, which will be added to each link of your campaign. Thanks to this information, you will be able to measure the efficiency of your marketing strategy and to compare the result of your communications.
To set them up, click on the "Plus" button then on "Additional url parameters".

Next, you will be able to enter the additional parameters:

utm_source: allows to identify the source of the publication which generates traffic towards this link (for example: newsletter).
utm_medium: allows to identify the marketing channel (in this case: e-mail)
utm_campaign: allows to identify the name of a campaign
The two other existing parameters (utm_content and utm_term) are optional.
Tip
It is possible to add customization on profile attributes to the url parameters by using the blue buttons.
Step 4: Check and Test
At this stage, you will be able to check the rendition of your e-mail campaign depending on the customizations and conditions you included.
Tip
If your internal validation processes for e-mail campaigns require sending various versions to several witness persons, you will be able to do it there.
Choose the testing group that you want to use to carry out your tests.
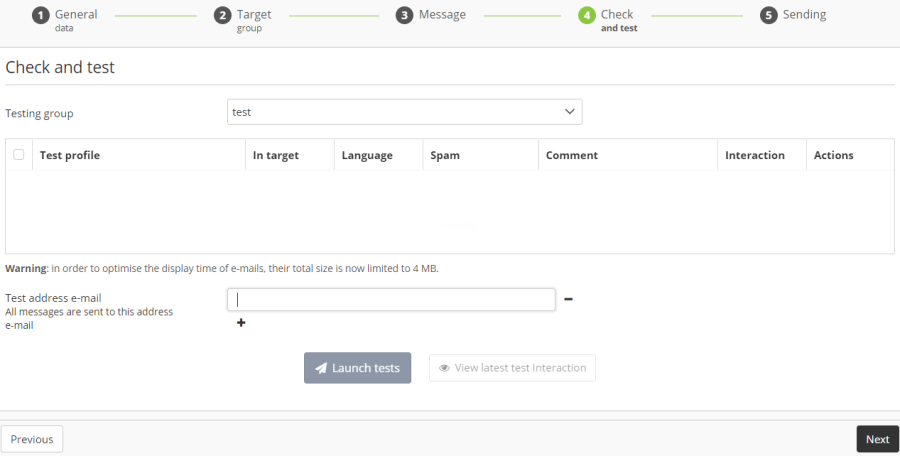
For additional information on testing groups, such as how to set them up and how to use them, we invite you to read the section dedicated to them.
After choosing the relevant testing group, you will be able to select test profiles then to specify a "Test e-mail address". The e-mails will be only sent to the given address instead of every selected profile, while applying customizations specific to them. It is possible to specify more than one redirection addresses.
If the message must be validated by different people, we advise you to send it to them at this stage, rather than forwarding the very same test message to everyone. Forwarding test emails may affect the email's layout and images.
With the button "View latest test Interaction", you can directly check the status of your test e-mail for each profile of your testing group, without having to use the "Profiles" module.
Tip
Avoid clicking on unsubscribe links during this step unless you want to test this feature. Unsubscribing in a test e-mail will be really taken into account for each test profile.
During this step, it is possible to save a campaign template. It is advised to use them should you want to facilitate the set-up of new campaigns.
To do so, click on the shortcut at the bottom of the page: "Other Actions: Save as template"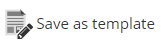
Step 5: Sending
If the content of your e-mail campaign does not contain any mistake, you will reach the Sending screen.
If everything is not correctly defined in your campaign, ACTITO will not let you validate the sending, in order to prevent you from sending a campaign which contains errors. Instead, an error message will be displayed. It will detail problems encountered with your campaign, in order to let you correct them.
A summary of every information specific to the campaign will be displayed. You will be invited to check:
The general data
The message headers
The target population
If both elements are correct, you will be able to send the campaign.
Marketing E-mail
If you created a Marketing e-mail (mass campaign), you will have the choice between:
Send now: Send immediately, without delay, as soon as you click on the button.
Schedule later: You can define the date and hour when your campaign will be sent. By scheduling the campaign at a later date, you make sure that your campaign will be effectively sent, without having to do anything later.
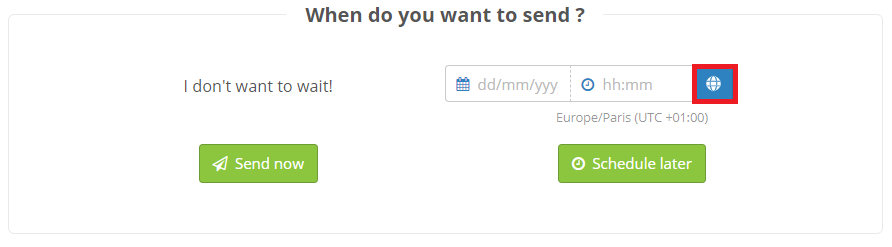
Timezone management
By default when you plan a campaign, the sending time will be calculated according to the timezone of your internet browser (displayed under the date picker). If you need to plan a campaign on another timezone, click on the "World" icon.
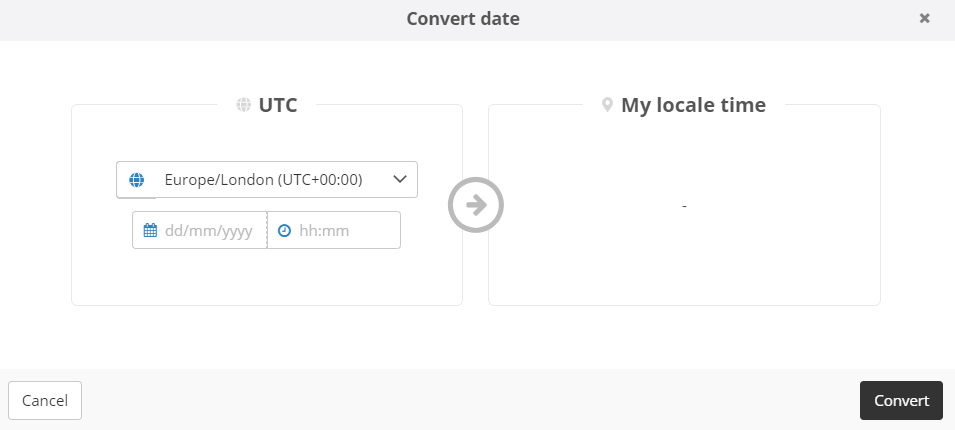
You will be able to convert any timezone into your local time.
Control group
You can set up a control group by selecting either a percentage or an absolute number of profiles.
A control group is a population sample to which the campaign will not be sent, in order to compare its efficiency with the behavior of profiles who did not receive it.

It is possible to find the list of profiles filtered in the control group by using the "E-mail (advanced)" targeting module.

Scenarized and Transactional E-mails
If you decided to create a continuous campaign (scenarized or transactional), you will be able to choose the "Activate sending" option. The e-mail will therefore be available for sending automation, such as planning scenarios.